Release 4.0
Part Number E18709-01
Contents
Previous
Next
| Oracle Application Management Pack for Oracle E-Business Suite User's Guide Release 4.0 Part Number E18709-01 | Contents | Previous | Next |
Smart Clone allows you to use the database target cloned using external third-party solutions as an input to the AMP's Smart Clone deployment procedures. AMP's Smart Clone procedures would take this input to configure a database target and then clone the applications tier of the source instance and then apply that to the target Oracle E-Business Suite system.
Smart Clone is supported for Release 11i instances only. Smart Clone supports the following procedures for Release 11i instances:
Configuring the single instance database
Configuring the RAC database
Cloning a single-node applications tier to a single-node applications tier
Performing scale-down cloning of a multi-tier applications tier with a shared file system node to a single-node applications tier
Performing scale-down cloning of a multi-tier applications tier without a shared file system node to a single-node applications tier
Note: Review the information in the previous chapter, "Cloning an Oracle E-Business Suite System," for an overview of cloning, including terminology and diagnostics tests.
This section describes the Smart Clone procedure to clone a source Oracle E-Business Suite instance having a single-node applications tier to a target Oracle E-Business Suite instance having a single-node applications tier.
Navigate to the Cloning home page. Select Smart Clone from the list and click Go.
Note that there is an assumption here that you have already cloned the source database to a target database using EM DB Provisioning or another technology.
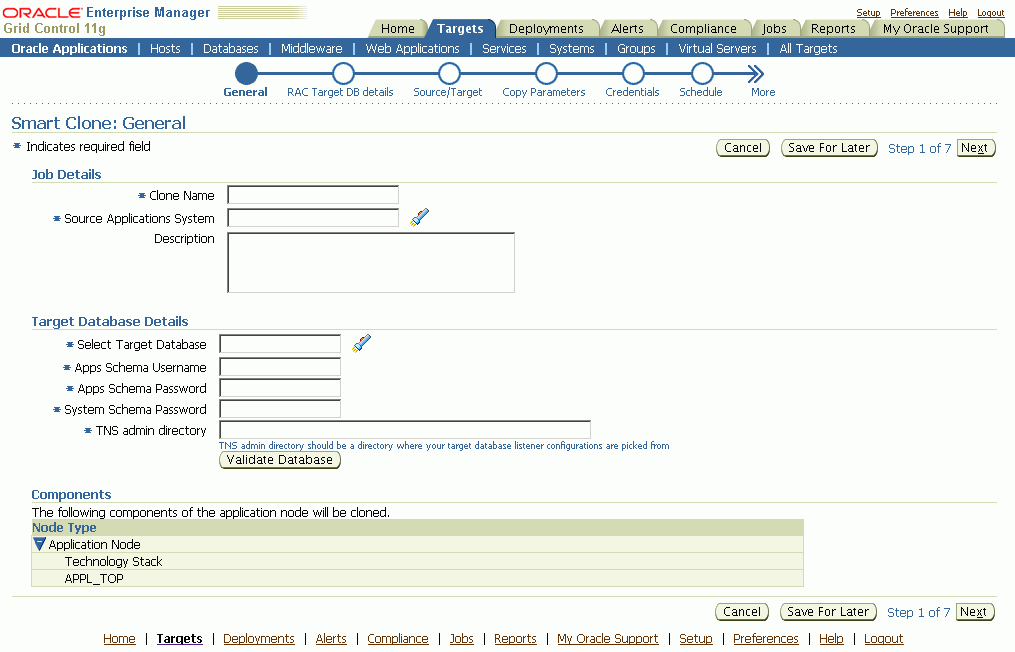
In the General page, enter the following under Job Details:
Clone Name - The Clone Transaction name.
Source Application System - Use the LOV to pick the source Oracle E-Business Suite instance.
Note that because Smart Clone supports cloning with Release 11i instances only, only Release 11i instances are listed in the LOV.
Under Target Database Details, enter the following:
Select Target Database - Pick the target database that is already cloned using the external tools and now needs to be configured as an Oracle E-Business Suite database.
Apps Schema Username
Apps Schema Password
System Schema Password - The target database system password.
TNS admin directory - Enter the TNS admin directory that is currently used by the Target Database Listener. This input text box will appear only if the database is of the type Single Database.
Use the Validate Database button to validate the target database.
Note: If the input Target Database is created having the TNS admin directory at <RDBMS_ORACLE_HOME>/network/admin/<DIRECTORY_NAME> (where <DIRECTORY_NAME> is an arbitrary name, and not <CONTEXT_NAME>) then the execution of the Smart Clone Deployment procedure might fail at the Step "Stop Target Database Listener". This error can safely be ignored and you can move forward to the next step.
In the Source/Target page, use the LOV to define the host where the applications tier needs to be deployed.

Click on the Specify Details icon to enter in other details about the target system.

In the Update Target Node Details page, enter the following under Locations:
Base Directory - Enter the base directory for the applications tier.
Override Defaults (Optional) - Use this option to override the default directories if you wish. Ensure the correct names for the directories are listed.
Under Services, all services are enabled and read-only by default for the Smart Clone flow.
Under Ports, the target database port is listed. Based on this port, you can choose the required port pool for the applications tier and check the availability of the same on the target host. Based on the port pool selected, the other port pool will be incremented accordingly from the default values.
In the Copy Parameters page, define the Copy parameters for the source to target procedure.
For Stage and Copy Options, choose one of the following:
No Copy - Choose No Copy if your source and destination stage directories are one and the same and on a disk which is shared by both the source and target hosts.

Copy - Choose Copy if your source and destination stage directories are different (or) on different hosts.
If you choose "Copy", you are prompted for Copy Options.
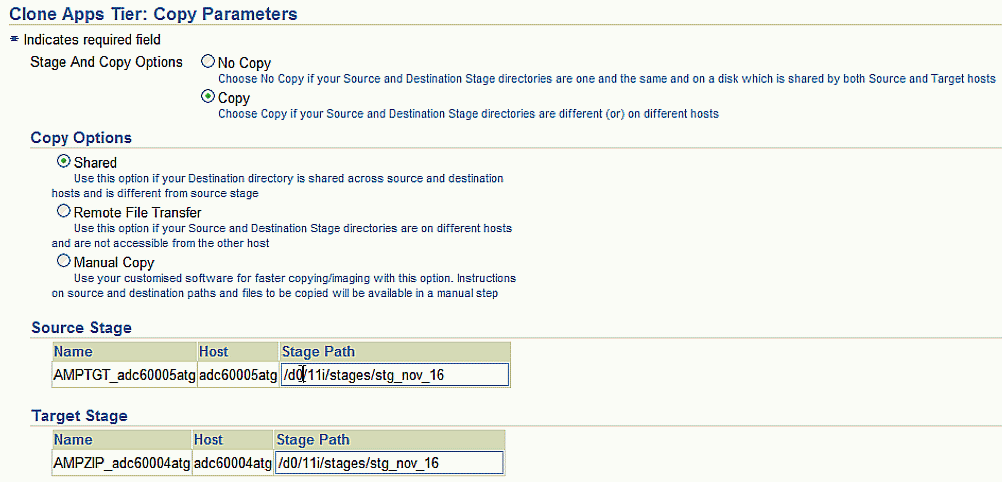
Specify your Source Stage Path and Target Stage Path.

Enter Credentials in the Credentials page.
If you choose the option "Use Preferred Credentials" for the Source System application node, the preferred credentials for the "Oracle E-Business Suite Infrastructure" target type should be set for the "APPL_TOP Context" context.
For the Target System, if you choose "Use Preferred Credentials", then the preferred credentials for the target host should be set for "Normal Username" and "Normal Password".
You can of course override the preferred credentials and enter them in this page. Use the Test buttons to test your entries.
On the Schedule page, specify if you want the clone procedure to run immediately or later.

On the Review page, review the procedure you have entered. You can click Save for Later to save the procedure, or click Finish if you want to submit it immediately.
This section describes the Smart Clone procedure to clone a source RAC Oracle E-Business Suite instance to a RAC target Oracle E-Business Suite instance.
Navigate to the Cloning home page. Select Smart Clone from the list and click Go.
Note that there is an assumption here that you have already cloned the source database to a target database using EM DB Provisioning or another technology.

In the General page, enter the following under Job Details:
Clone Name - The Clone Transaction name.
Source Application System - Use the LOV to pick the source Oracle E-Business Suite instance.
Note that because Smart Clone supports cloning with Release 11i instances only, only Release 11i instances are listed in the LOV.
Under Target Database Details, enter the following:
Select Target Database - Pick the target Oracle E-Business Suite database. This database must be of type RAC.
Apps Schema Username
Apps Schema Password
System Schema Password - The target database system password.
Use the Validate Database button to validate the target database. This validation will catch any errors in the user-entered fields of this target database.
The RAC Target DB Details page is enabled only for RAC target flows. Here you enter the virtual host name, listener name, and the TNS admin directory for each node of the RAC.

Under RAC Target DB Node Specific Details is a table with a row for each node present in the RAC. For each row, enter the following:
Virtual Host Name
Listener Name
TNS admin directory - Enter the TNS admin directory that is currently used by the Target Database Listener."
In the Source/Target page, use the LOV to define the host where the applications tier needs to be deployed.

Click on the Specify Details icon to enter in other details about the target system.
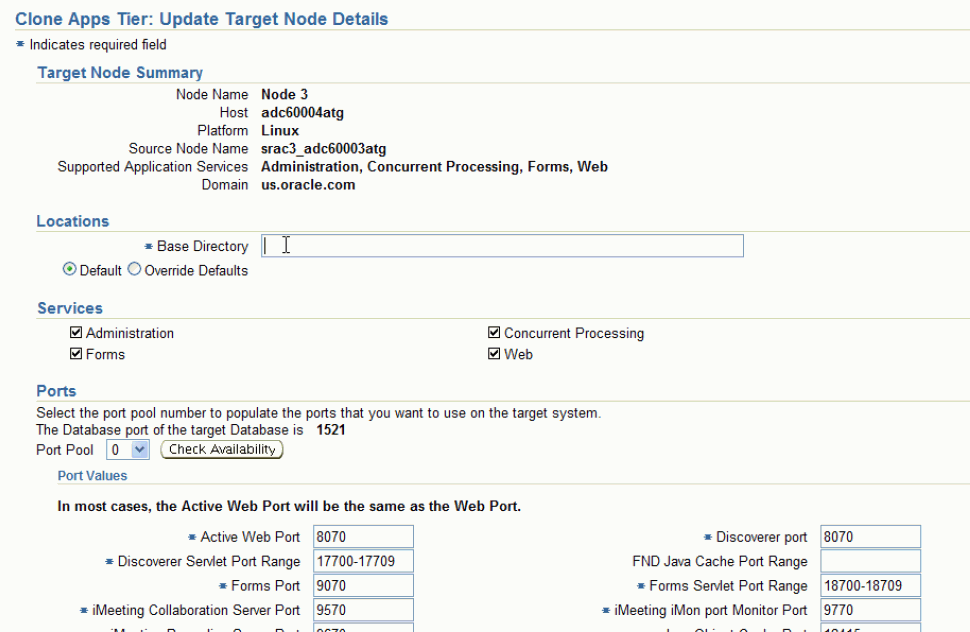
In the Update Target Node Details page, enter the following under Locations:
Base Directory - Enter the base directory for the applications tier.
Choose one of the following:
Default - If this option is chosen, other directory structures will be derived based on the base directory entered.
Override Defaults - Use this option to override the default directories if you wish. You can then individually override the default values.
Under Services, all services are enabled and read-only by default for the Smart Clone flow.
Under Ports, the target database port is listed. Based on this port, you can choose the required port pool for the applications tier and check the availability of the same on the target host. Based on the port pool selected, the other port pool will be incremented accordingly from the default values.
In the Copy Parameters page, define the Copy parameters for the source to target procedure.

For Stage and Copy Options, choose one of the following:
No Copy - Choose No Copy if your source and destination stage directories are one and the same and on a disk which is shared by both the source and target hosts.
Copy - Choose Copy if your source and destination stage directories are different (or) on different hosts.
If you choose "Copy", you are prompted for Copy Options.
Specify your Source Stage Path and Target Stage Path.
Enter Credentials in the Credentials page.
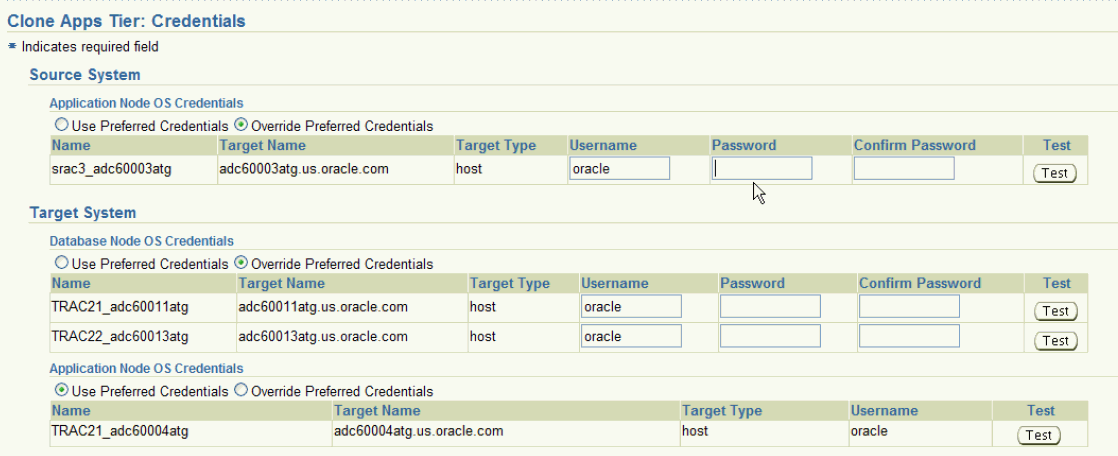
If you choose the option "Use Preferred Credentials" for the Source System application node, the preferred credentials for the "Oracle E-Business Suite Infrastructure" target type should be set for the "APPL_TOP Context" context.
For the Target System, if you choose "Use Preferred Credentials", then the preferred credentials for the target host should be set for "Normal Username" and "Normal Password".
You can of course override the preferred credentials and enter them manually in this page. Use the Test buttons to test your entries.
Note that for the Target System credentials, the Database Node OS Credentials table shows all the nodes of the database.
On the Schedule page, specify if you want the clone procedure to run immediately or later.
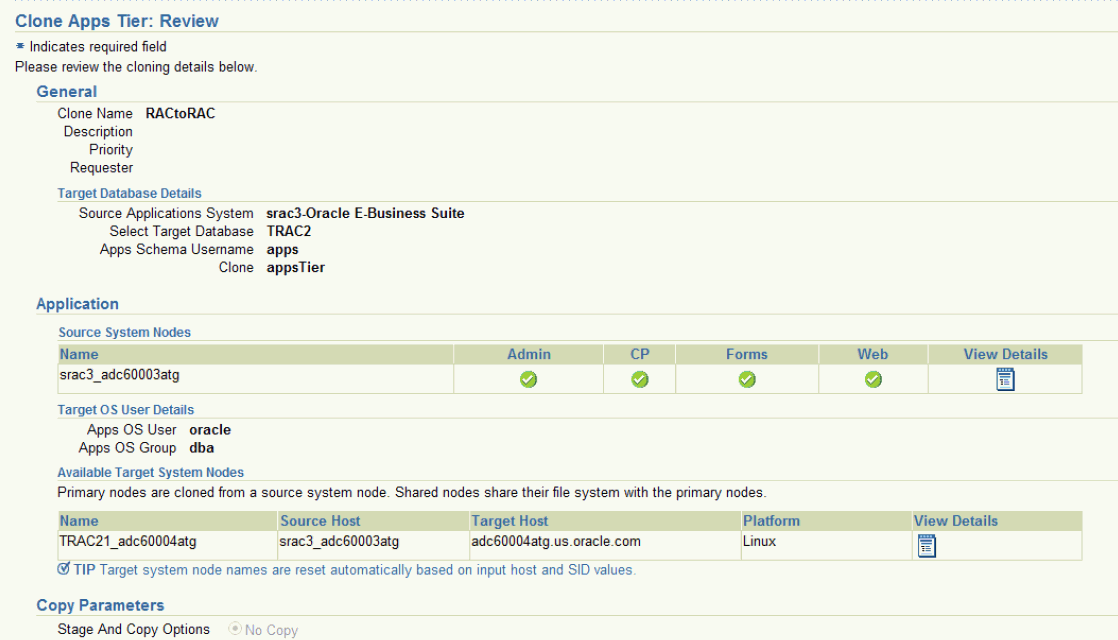
On the Review page, review the procedure you have entered. You can click Save for Later to save the procedure, or click Finish if you want to submit it immediately.
With Smart Clone, if the target Oracle E-Business Suite instance database is of type "RAC" and if you want to configure Parallel Concurrent Processing after the clone is completed, then it is recommended that you follow instructions described in the following My Oracle Support Knowledge Documents, depending on your RDBMS version:
Document 312731.1, "Configuring Oracle Applications Release 11i with 10g RAC and 10g ASM"
Document 757980.1, "Using Oracle 11g Release 1 Real Application Clusters and Automatic Storage Management with Oracle E-Business Suite Release 11i (11.1.0.6)"
Document 455398.1, "Using Oracle Real Application Clusters and Automatic Storage Management with Oracle E-Business Suite Release 11i and Oracle Database 11g"
This section describes the Smart Clone procedure to clone a multi-node Oracle E-Business Suite source instance with a Shared File System to a target Oracle E-Business Suite instance having a single-node applications tier.
Navigate to the Cloning home page. Select Smart Clone from the list and click Go.
Note that there is an assumption here that you have already cloned the source database to a target database using EM DB Provisioning or another technology.

In the General page, enter the Job Details.
Clone Name - The Clone Transaction name.
Source Application System - Use the LOV to pick the source Oracle E-Business Suite instance.
Note that because Smart Clone supports cloning with Release 11i instances only, only Release 11i instances are listed in the LOV.
Under Target Database Details, enter the following:
Select Target Database - Pick the target database that is already cloned using the external tools and now needs to be configured as an Oracle E-Business Suite database.
Apps Schema Username
Apps Schema Password
System Schema Password - The target database system password.
TNS admin directory - Enter the TNS admin directory that is currently used by the Target Database Listener. This input text box will appear only if the database is of the type Single Database.
Use the Validate Database button to validate the target database.
Enter Source and Target information on the Source/Target page.
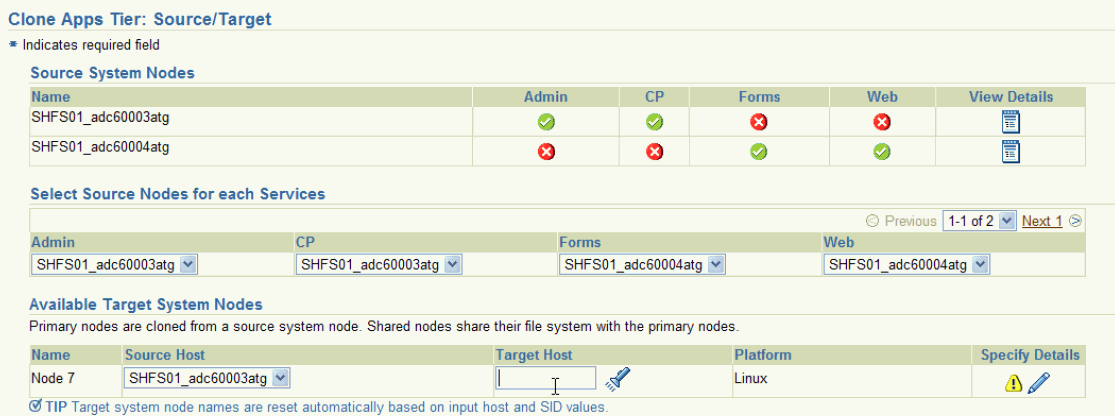
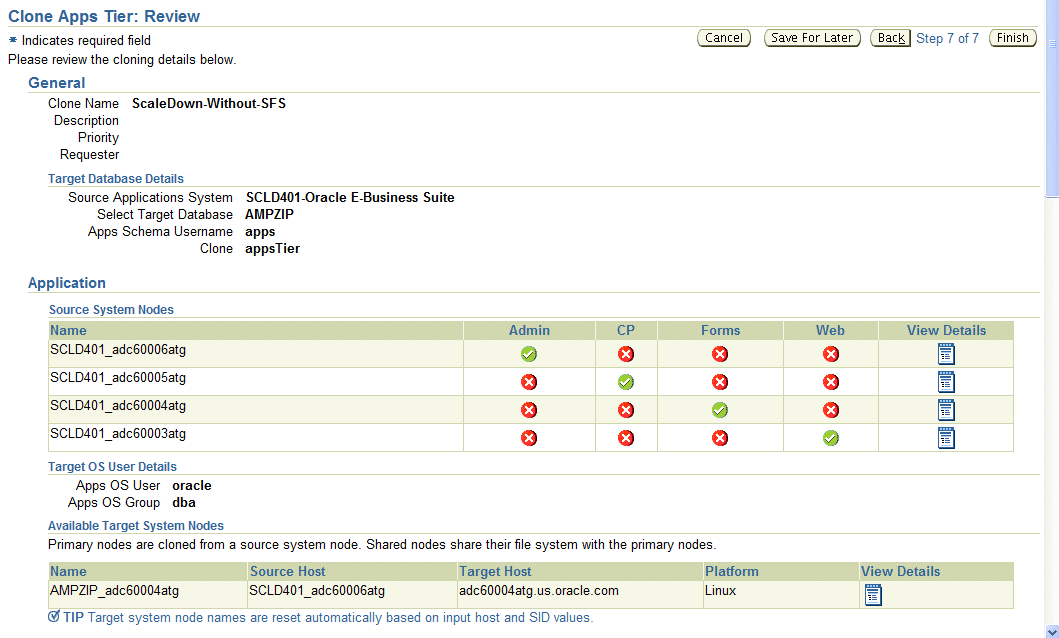
Source System Nodes - This table has details on which applications tier has which service (Admin, Concurrent Processing, Forms, or Web). Use the icon under View Details to see more information for each node.
Select Source Nodes for each Service - In this table, map the node for each individual service. If you have more than one node for the same service, then you have to pick one that references the applications tier node.
Available Target System Nodes - You can pick any of the source nodes as a reference node for the Source Host field. Select the target host for the applications tier using the LOV.
Click on the icon under Specify Details to add more information on the target instance applications tier. If you do not specify details and click the Next button to proceed onward, you will get an error message.
Enter in additional details about the target instance applications tier.
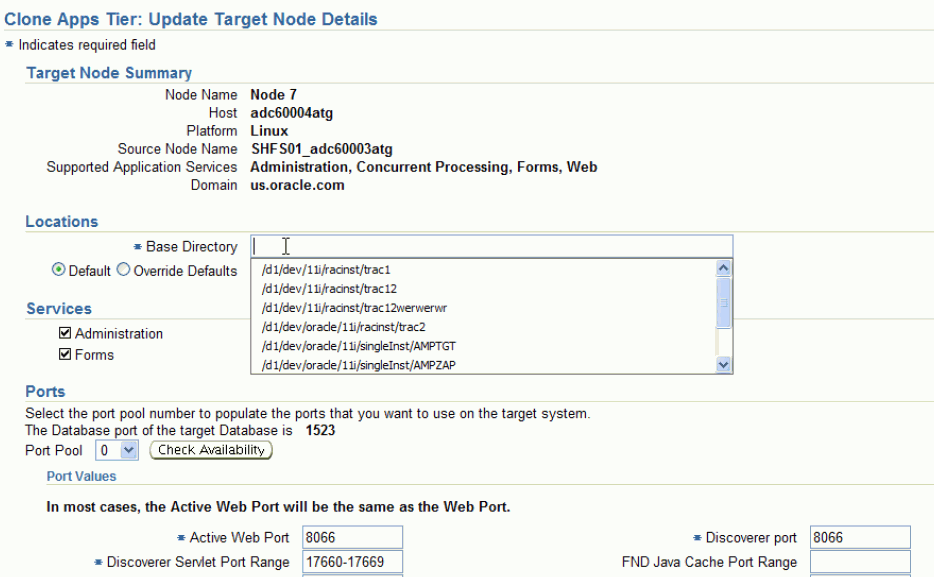
In the Update Target Node Details page, enter the following under Locations:
Base Directory - Enter the base directory for the applications tier.
Override Defaults (Optional) - Use this option to override the default directories if you wish. Ensure the correct names for the directories are listed.
Under Services, all services are enabled and read-only by default for the Smart Clone flow.
Under Ports, the target database port is listed. Based on this port, you can choose the required port pool for the applications tier and check the availability of the same on the target host. Based on the port pool selected, the other port pool will be incremented accordingly from the default values.
In the Copy Parameters page, define the Copy parameters for the source to target procedure.

For Stage and Copy Options, choose one of the following:
No Copy - Choose No Copy if your source and destination stage directories are one and the same and on a disk which is shared by both the source and target hosts.
Copy - Choose Copy if your source and destination stage directories are different (or) on different hosts.
If you choose "Copy", you are prompted for Copy Options.
Specify your Source Stage Path. In the case of a Shared File System, because the APPL_TOP is shared across all the applications tier nodes of the source Oracle E-Business Suite instance, any one stage location should be usable here.
Specify your Target Stage Path.
Enter Credentials in the Credentials page.
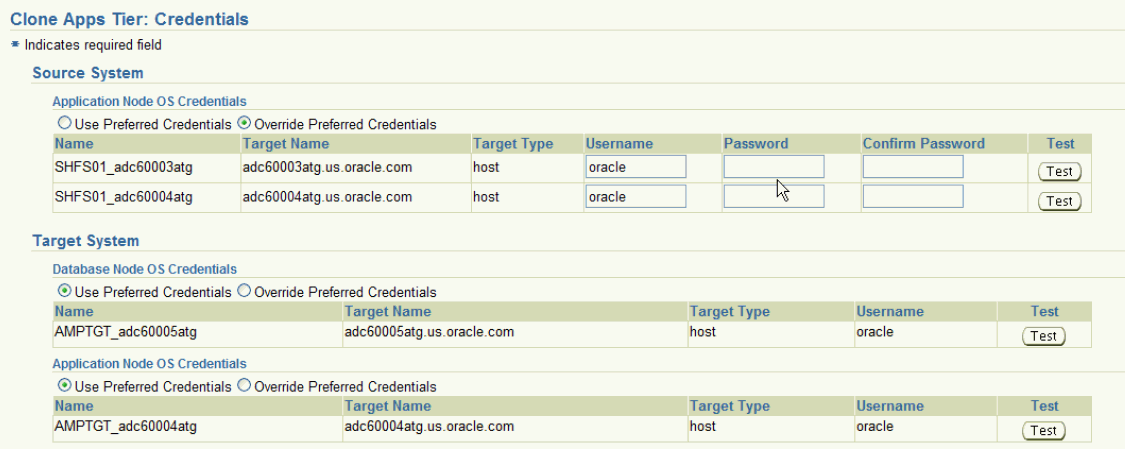
If you choose the option "Use Preferred Credentials" for the Source System application node, the preferred credentials for the "Oracle E-Business Suite Infrastructure" target type should be set for the "APPL_TOP Context" context.
For the Target System, if you choose "Use Preferred Credentials", then the preferred credentials for the target host should be set for "Normal Username" and "Normal Password".
You can of course override the preferred credentials and enter them manually in this page. Use the Test buttons to test your entries.
On the Schedule page, specify if you want the clone procedure to run immediately or later.
On the Review page, review the procedure you have entered. You can click Save for Later to save the procedure, or click Finish if you want to submit it immediately.

This section describes the Smart Clone procedure to clone a multi-node Oracle E-Business Suite source instance without a Shared File System to a target Oracle E-Business Suite instance having a single-node applications tier.
Navigate to the Cloning home page. Select Smart Clone from the list and click Go.
Note that there is an assumption here that you have already cloned the source database to a target database using EM DB Provisioning or another technology.

In the General page, enter the following under Job Details:
Clone Name - The Clone Transaction name.
Source Application System - Use the LOV to pick the source Oracle E-Business Suite instance.
Note that because Smart Clone supports cloning with Release 11i instances only, only Release 11i instances are listed in the LOV.
Under Target Database Details, enter the following:
Select Target Database - Pick the target database that is already cloned using the external tools and now needs to be configured as an Oracle E-Business Suite database.
Apps Schema Username
Apps Schema Password
System Schema Password - The target database system password.
TNS admin directory - Enter the TNS admin directory that is currently used by the Target Database Listener. This input text box will appear only if the database is of the type Single Database.
Use the Validate Database button to validate the target database.
Enter Source and Target information on the Source/Target page.

Source System Nodes - This table has details on which applications tier has which service (Admin, Concurrent Processing, Forms, or Web). Use the icon under View Details to see more information for each node.
Select Source Nodes for each Service - In this table, map the node for each individual service.
Important: You must run the "Update Snapshot" utility of the adadmin tool on at least the chosen nodes for each of the services before submitting this Smart Clone deployment procedure.
Available Target System Nodes - You can pick any of the source nodes as a reference node for the Source Host field. Select the target host for the applications tier using the LOV.
Click on the icon under Specify Details to add more information on the target instance applications tier. If you do not specify details and click the Next button to proceed onward, you will get an error message.
Enter in additional details about the target instance applications tier.
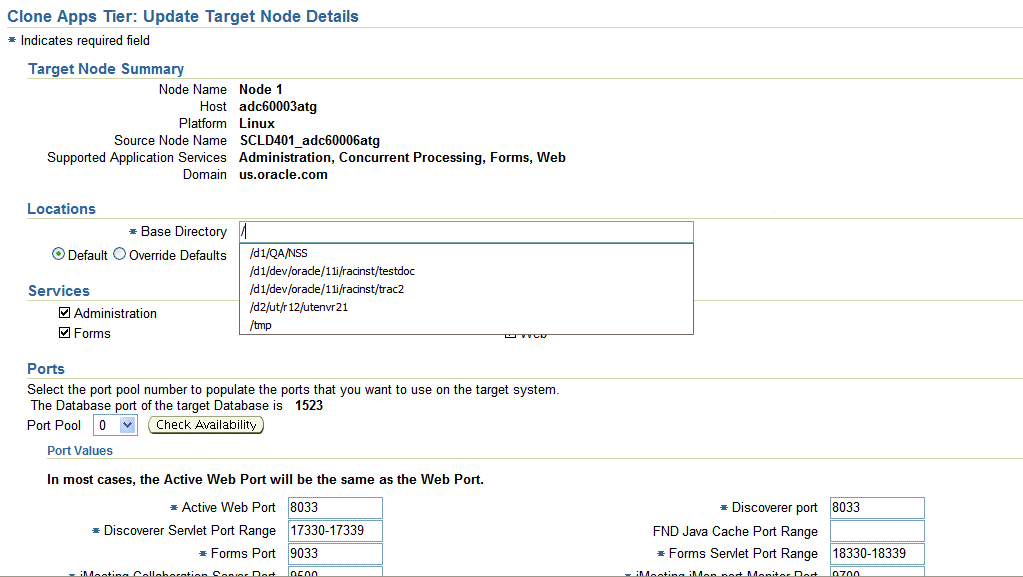
In the Update Target Node Details page, enter the following under Locations:
Base Directory - Enter the base directory for the applications tier.
Override Defaults (Optional) - Use this option to override the default directories if you wish. Ensure the correct names for the directories are listed.
Under Services, all services are enabled and read-only by default for the Smart Clone flow.
Under Ports, the target database port is listed. Based on this port, you can choose the required port pool for the applications tier and check the availability of the same on the target host. Based on the port pool selected, the other port pool will be incremented accordingly from the default values.
In the Copy Parameters page, define the Copy parameters for the source to target procedure.
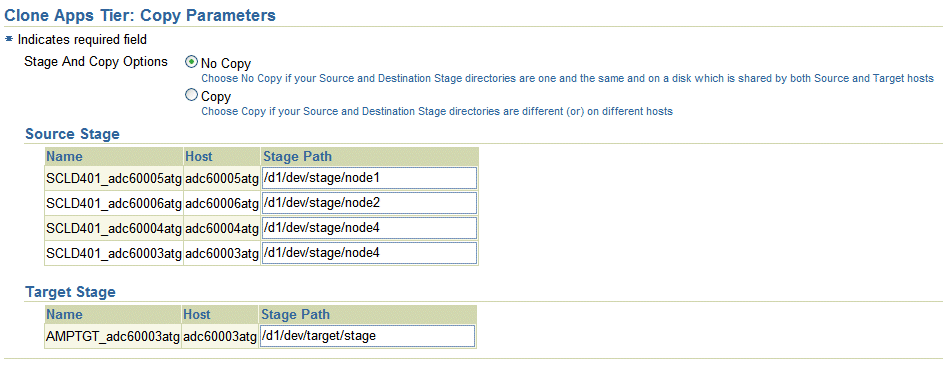
For Stage and Copy Options, choose one of the following:
No Copy - Choose No Copy if your source and destination stage directories are one and the same and on a disk which is shared by both the source and target hosts.
Copy - Choose Copy if your source and destination stage directories are different (or) on different hosts.
If you choose "Copy", you are prompted for Copy Options.
Specify your Source Stage Paths. In the case of a multi-node applications tier without a shared file system of the source Oracle E-Business Suite instance, you must provide the stage directory for each of the nodes.
Specify your Target Stage Path.
Enter Credentials in the Credentials page.
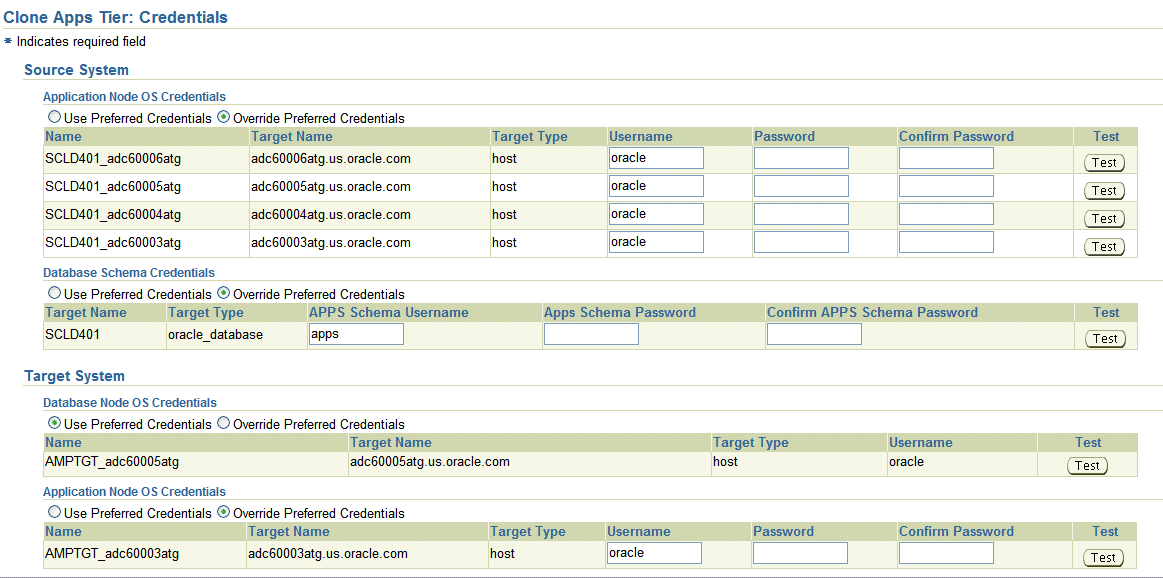
If you choose the option "Use Preferred Credentials" for the Source System application node, the preferred credentials for the "Oracle E-Business Suite Infrastructure" target type should be set for the "APPL_TOP Context" context.
For the Target System, if you choose "Use Preferred Credentials", then the preferred credentials for the target host should be set for "Normal Username" and "Normal Password".
You can of course override the preferred credentials and enter them manually in this page. Use the Test buttons to test your entries.
Note: The table for Source Database Schema appears only for scale-down cloning of a multi-node source instance without a Shared File System. It does not appear for other types of Smart Clone flows.
On the Schedule page, specify if you want the clone procedure to run immediately or later.
On the Review page, review the procedure you have entered. You can click Save for Later to save the procedure, or click Finish if you want to submit it immediately.
A Smart Clone procedure runs the tasks of zipping, transferring, and unzipping files for the Applications tier file system.
The following properties in the amp.properties file can be altered to configure the number of parallel jobs to be used by the Smart Clone while performing these different steps in the deployment procedure:
ampCloneApplTopParallelThreads=8 This value will determine the number of threads to be used while zipping, transferring, and unzipping the files under APPL_TOP of the Applications tier. Maximum value: 16, default: 8
ampCloneToolsParallelThreads=4 This value will determine the number of threads to be used while zipping, transferring, and unzipping the files under the Tools home of Applications tier. Maximum value: 8, default: 4
ampCloneWebParallelThreads=2 This value will determine the number of threads to be used while zipping, transferring, and unzipping the files under the Web home of Applications tier. Maximum value: 4, default: 2
ampCloneCommonTopParallelThreads=2 This value will determine the number of threads to be used while zipping, transferring, and unzipping the files under COMMON_TOP of the Applications tier. Maximum value: 4, default: 2
Note: If the unzipping of the Applications tier file system fails for some reason, then you must remove all the existing files present in the target system before retrying the procedure. Smart Clone does not handle overwriting the existing files while unzipping.
![]()
Copyright © 2007, 2011, Oracle and/or its affiliates. All rights reserved.