| Oracle® Database 2 Day + Data Replication and Integration Guide 11g Release 2 (11.2) Part Number E17516-06 |
|
|
PDF · Mobi · ePub |
| Oracle® Database 2 Day + Data Replication and Integration Guide 11g Release 2 (11.2) Part Number E17516-06 |
|
|
PDF · Mobi · ePub |
This chapter describes how to configure an Oracle Streams Advanced Queuing (AQ) environment that sends messages between databases and applications. It also describes administering, monitoring, and troubleshooting a messaging environment once it is in place.
This chapter contains the following sections:
A messaging environment stores information in queues. Enqueuing is the process of placing messages into queues. Dequeuing is the process of retrieving messages from queues.
The information in queues can be used to complete tasks, or it can be processed by applications. A messaging environment allows applications to communicate with each other asynchronously. That is, one application does not need to wait for another application to complete a particular task. Asynchronous communication means that a messaging system has minimal impact on the functionality of the applications that use the system.
For example, when one application wants to communicate with another application, it can put messages in a queue. The messages can be stored in the queue until the other application retrieves them. In fact, one application might not be running while another application is enqueuing messages for it to process later. The messages might instruct the retrieving application to perform an action, or the messages might contain information that must be processed by the retrieving application.
When an organization has several different systems that must communicate with each other, a messaging environment can be a good solution. The various systems might be in different locations, some might be older than others, and some might run on different platforms. Messaging provides a standard, reliable way to transport critical information between these systems.
The messaging feature of Oracle Database is called Oracle Streams Advanced Queuing (AQ). Oracle Streams AQ provides the advantages of messaging, and it also integrates the messaging system with Oracle Database. Therefore, Oracle Streams AQ provides the reliability, scalability, security, and manageability of Oracle Database.
You can use Oracle Streams AQ to configure a messaging environment that sends messages between queues in a single database or between queues in different databases. A messaging environment that sends messages between queues includes the following components:
Queues: Abstract storage units that store messages in a messaging environment
Producers: Users or applications that enqueue messages
Propagations: Oracle Scheduler jobs that copy messages from one queue to another according to a set schedule
Consumers: Users or applications that dequeue messages
A single user or application can act as both a producer and a consumer. In a messaging environment, both subscribers and messaging clients are consumers. Both subscribers and messaging clients are mechanisms that are authorized to dequeue messages from a queue, and both can use rules to determine which messages to dequeue.
Oracle Streams AQ provides many features, some of which are beyond the scope of this guide. The following topics provide an overview of some of the features of Oracle Streams AQ:
See Also:
Oracle Streams Concepts and Administration for more information about messaging clients
Oracle Streams Advanced Queuing User's Guide for detailed information about subscribers and all of the other features of Oracle Streams AQ
Message ordering determines the order in which messages are dequeued. Oracle Streams Advanced Queuing (AQ) provides the following options for message ordering:
Enqueue time: Messages are dequeued in the same order that they were enqueued. This option is sometimes called first in first out (FIFO) ordering. For example, banking applications often use this ordering so that financial transactions are always ordered according to the time when they occurred.
Priority: A priority is specified for messages during enqueuing, and messages are dequeued based on their priority. For example, shipping companies might use this ordering for messages because some packages have higher priority than others.
Commit time: Messages are dequeued based on when the transaction that enqueued the messages committed. Commit-time ordering is typically used when the messages result in database changes with transaction dependencies. For example, an application that handles sales for a company might use commit-time ordering when the messages result in changes to several database tables that have dependencies.
Oracle Streams Advanced Queuing (AQ) supports the following message modes:
Persistent messaging: Messages are always stored on disk in a database table called a queue table. This type of storage is sometimes called persistent queue storage.
Buffered messaging: Messages are stored in memory but can spill to a queue table under certain conditions. This type of storage is sometimes called buffered queue storage.
Buffered messaging provides better performance, but it does not support some messaging features, such as message retention. Message retention lets you specify the amount of time a message is retained in the queue table after being dequeued. In addition, when a database goes down unexpectedly, persistent messages are retained on disk, but buffered messages can be lost because they are stored in memory.
Message retention provides an audit trail, which might be required for some organizations. For example, while messages are stored in the queue table, users and applications can run queries to gather information about the messages. For example, a sales application might gather this information to generate a report on orders.
See Also:
Oracle Streams Advanced Queuing User's Guide for information about the differences between persistent messaging and buffered messaging
Oracle Streams Advanced Queuing (AQ) can notify an application and users when a message of interest is enqueued. Notifications enable applications and users to do their work without constantly checking a queue for new messages. Notifications can be sent to an application using PL/SQL, Java Message Service (JMS), or Oracle Call Interface (OCI) callback functions. Notification can also be sent to a specified e-mail address or HTTP post. In addition, notifications can be presented in either RAW data type form or XML form. Applications and users do not need to be connected to a database to receive notifications. When they are notified that a message of interest has appeared in a queue, they can connect to the database and check the queue.
Propagation is the process of sending messages from one queue to another. These queues can be in the same database or in different databases. Propagations are not a required part of a messaging system. Propagations enable applications to communicate with each other even if they are not connected to the same database or same queue. Also, using multiple propagations, you can send the same messages from one queue to several other queues.
Propagations use database links to send messages between queues at different databases. A database link is a pointer that defines a one-way communication path from an Oracle database to another database. Propagation is performed by an Oracle Scheduler job called a propagation job. A propagation schedule determines how often a propagation sends messages, and you control the schedule for each propagation job.
Oracle Streams Advanced Queuing (AQ) supports both queue-to-queue or queue-to-database link (queue-to-dblink) propagations. A queue-to-queue propagation always has its own exclusive propagation job to send messages from the source queue to the destination queue. Therefore, the propagation schedule of each queue-to-queue propagation can be managed separately. Multiple queue-to-queue propagations can use a single database link. Use queue-to-queue propagation when you want fine-grained control over multiple propagations that send messages from a single queue, and each propagation should use a different schedule.
In contrast, a queue-to-dblink propagation shares a propagation job with other queue-to-dblink propagations from the same source queue that use the same database link. If several propagations send messages from a single source queue to several queues at the remote database, then these propagations share the same propagation schedule. Any change to the propagation schedule affects all of the queue-to-dblink propagations from the same source queue that use the database link. Use queue-to-dblink propagation when you want bulk control over multiple propagations that send messages from a single queue, and all of the propagations should use the same schedule.
Oracle Messaging Gateway integrates an Oracle Streams Advanced Queuing (AQ) messaging system with other messaging systems, such as IBM Websphere MQ (formerly called MQSeries) and TIBCO Rendezvous. This integration enables Oracle Database applications that use Oracle Streams AQ to communicate bidirectionally and seamlessly with other applications that use non-Oracle messaging systems.
Messaging Gateway uses a gateway agent to send messages from Oracle Streams AQ queues to queues in non-Oracle messaging systems. The gateway agent also enables Oracle Streams AQ queues to receive messages from non-Oracle messaging systems.
Messaging Gateway supports automatic type conversion for Oracle Streams AQ types that can be directly mapped to a non-Oracle messaging system. For types that cannot be directly mapped, you can define custom transformations to map the types. Once defined, custom transformations are performed automatically during propagation.
Messaging Gateway supports the native message formats of the messaging systems. Oracle Streams AQ messages can have RAW or any Oracle object type payload supported by Oracle Streams AQ. IBM Websphere MQ messages can be text or byte messages. TIBCO Rendezvous messages can be any TIBCO Rendezvous wire format data type.
Oracle Streams AQ queues can be securely accessed through the Internet. Messaging Gateway provides secure, Internet-enabled messaging between Oracle Streams AQ queues and queues in a non-Oracle messaging system.
See Also:
Oracle Streams Advanced Queuing User's Guide for detailed information about the Oracle Messaging Gateway and for information about how to use it
This topic describes actions that are required to prepare your databases for a messaging environment.
To prepare your databases for a messaging environment:
Set the GLOBAL_NAMES initialization parameter to TRUE at each database involved in the messaging environment. See "Setting the GLOBAL_NAMES Initialization Parameter to TRUE" for instructions.
Configure network connectivity so that a database that sends messages can communicate with a database that receives messages. See Oracle Database 2 Day DBA for information about configuring network connectivity between databases.
Configure an Oracle Streams administrator at each database involved in the messaging environment. See "Tutorial: Configuring an Oracle Streams Administrator" for instructions.
Ensure that the Oracle Streams pool is large enough to accommodate the queues created for the messaging environment. Each queue requires at least 10 MB of memory. The Oracle Streams pool is part of the System Global Area (SGA). You can manage the Oracle Streams pool by setting the MEMORY_TARGET initialization parameter (Automatic Memory Management), the SGA_TARGET initialization parameter (Automatic Shared Memory Management), or the STREAMS_POOL_SIZE initialization parameter. See Oracle Streams Replication Administrator's Guide for more information about the Oracle Streams pool.
The example in this topic involves a business that enters orders in an Oracle database at headquarters. When an order is entered, the business wants to use a messaging system to send the order ID and order date to an Oracle database in a warehouse in a different location. These messages alert employees at the warehouse about the orders so that they can fill and ship them. The employees at the warehouse have access to the data at headquarters to find detailed information about any particular order.
This example uses the oe sample schema for its order-entry schema. The oe sample schema is installed by default with Oracle Database.
In this example, the global name of the database at headquarters is ii1.example.com, and the global name of the database at the warehouse is ii2.example.com. However, you can substitute any two databases in your environment to complete the example.
Figure 9-1 provides an overview of the messaging environment created in this example.
Figure 9-1 Sample Messaging Environment That Sends Messages Between Databases
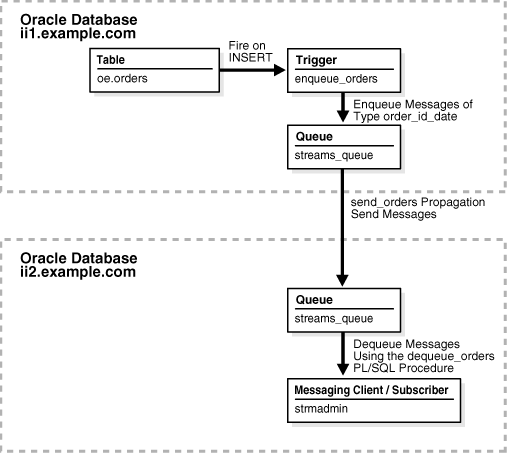
Before you start this example, complete the tasks described in "Preparing for Messaging".
To configure a messaging system that sends messages about orders from the ii1.example.com database to the ii2.example.com database:
Create a user-defined type to define the information that you want to send about orders. This example creates the strmadmin.order_id_date type for messages that will contain the order ID and order date.
To create the strmadmin.order_id_date type at each database:
Prepare your environment for messaging if you have not already done so. See "Preparing for Messaging".
In Oracle Enterprise Manager, log in to the ii1.example.com database as the Oracle Streams administrator.
On the Object Types page, click Create to open the Create Object Type page.
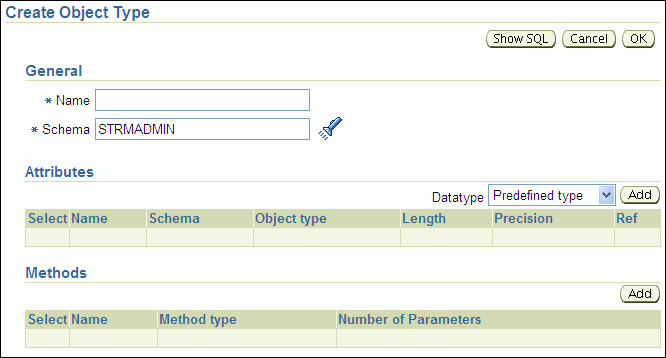
Enter order_id_date in the Name field.
Ensure that strmadmin is selected in the Schema field.
Ensure that Predefined Type is selected for Datatype in the Attributes section.
Click Add in the Attributes section to open the Add Predefined Type Attributes page.

To add an attribute:
Enter order_id in the Name field.
Select NUMBER for Type.
Enter 12 in the Length field.
Click OK.
On the Create Object Type page, ensure that Predefined Type is selected in the Attributes section.
Click Add in the Attributes section to open the Add Predefined Type Attributes page.
To add an attribute:
Enter order_date in the Name field.
Select VARCHAR2 for Type.
Enter 100 in the Length field.
Click OK.
On the Create Object Type page, click OK to create the type.
Log in to the ii2.example.com database as the Oracle Streams administrator in Enterprise Manager.
Complete Steps 3 through 15 at the ii2.example.com database so that both databases have the strmadmin.order_id_date type.
Complete the steps in "Task 2: Configuring the Queues and Propagation Between Them" to continue this extended example.
Note:
You can also use theCREATE TYPE SQL statement to create a type.Create a queue at each database, and create a propagation to send messages about orders from the queue at the ii1.example.com database to the queue at the ii2.example.com database.
To create a propagation:
Create a queue named streams_queue in the schema of the Oracle Streams administrator at both the ii1.example.com and ii2.example.com databases. See "Creating an ANYDATA Queue" for instructions.
Create a database link named ii2.example.com in the Oracle Streams administrator schema at ii1.example.com. Configure the database link to connect to the Oracle Streams administrator schema at ii2.example.com. The service name of the database link must be ii2.example.com. See "Tutorial: Creating a Database Link" for instructions.
In Oracle Enterprise Manager, log in to the ii1.example.com database as the Oracle Streams administrator.
Go to the Database Home page.
Under High Availability, click the number link in Streams Components.
On the Manage Replication page, click Setup Propagation in Related Links to open the Setup Propagation page.

Enter send_orders in the Propagation Name field.
Enter strmadmin.streams_queue in the Source Queue field. This queue is the queue at the ii1.example.com database into which messages about orders will be enqueued.
Enter the name of the database link that you created in Step 2 in the Destination Database Link field. In this example, the database link name is ii2.example.com.
Enter strmadmin.streams_queue in the Destination Queue field. This is the queue at the ii2.example.com database to which messages about orders will be sent.
Leave the Positive Rule Set and Negative Rule Set fields empty. When a propagation does not have a rule set, it sends all of the messages in the source queue to the destination queue.
Enable the Queue to Queue Propagation option.
Click OK to create the propagation.
Complete the steps in "Task 3: Configuring a Message Enqueuing Mechanism" to continue this extended example.
Note:
You can also use theDBMS_PROPAGATION_ADM.CREATE_PROPAGATION procedure to create a propagation.Configure a mechanism to enqueue the messages in your messaging system. Typically, an application creates and enqueues messages that will be dequeued and processed by another application. For simplicity, this example creates a trigger called enqueue_orders to enqueue a message that includes the order ID and order date of an order. The trigger fires when an order is inserted into the oe.orders table.
To configure a message enqueuing mechanism:
Grant the EXECUTE privilege on the DBMS_STREAMS_MESSAGING package to the Oracle Streams administrator.
This example configures a trigger that runs the ENQUEUE procedure in the DBMS_STREAMS_MESSAGING package. The user who runs this procedure in a trigger must have explicit EXECUTE privilege on the package that contains the procedure. The privilege cannot be granted through a role. Therefore, the Oracle Streams administrator must be granted explicit EXECUTE privilege on the package.
Log in to Enterprise Manager as an administrative user who can grant privileges to the strmadmin user. For example, you can log in as a user with SYSDBA privilege. In this example, log in to the ii1.example.com database.
Go to the Database Home page.
Click Server to open the Server subpage.
Click Users in the Security section.
The Users page appears.
Select the STRMADMIN user.
Click Edit.
The Edit User page appears, showing the General subpage.
Click Object Privileges to open the Object Privileges subpage.

Select Package in the Select Object Type list.
Click Add to open the Add Package Object Privileges page.
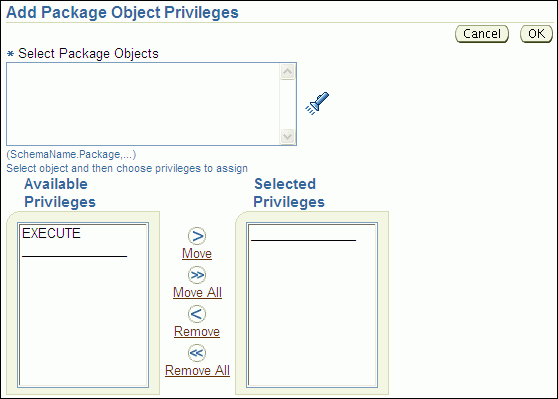
Enter SYS.DBMS_STREAMS_MESSAGING in the Select Package Objects field.
Move EXECUTE from the Available Privileges list to the Selected Privileges list.
Click OK to add the privilege.
Click Apply to grant the privilege.
Log out of Enterprise Manager.
Note:
You can also use theGRANT SQL statement to grant privileges to a user.Create a trigger in the ii1.example.com database to enqueue a message automatically when a change is made to the oe.orders table.
Log in to ii1.example.com database in Enterprise Manager as the Oracle Streams administrator.
Go to the Database Home page.
Click Schema to open the Schema subpage.
Click Triggers in the Programs section.
On the Triggers page, click Create.
The Create Trigger page appears, showing the General subpage.
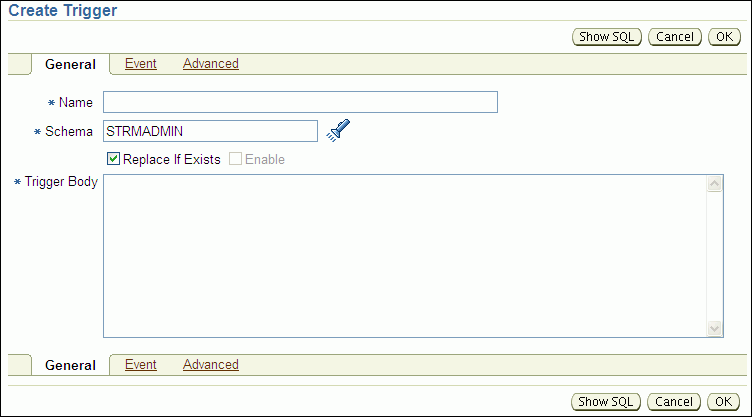
Enter enqueue_orders in the Name field.
Ensure that strmadmin is entered in the Schema field.
Enter the following in the Trigger Body field:
DECLARE
  message  strmadmin.order_id_date;
BEGIN
  message := strmadmin.order_id_date(
                order_id   => :NEW.order_id,
                order_date => TO_CHAR(:NEW.order_date));
  DBMS_STREAMS_MESSAGING.ENQUEUE (
    queue_name => 'strmadmin.streams_queue',
    payload    => ANYDATA.CONVERTOBJECT(message));
END;
Click Event to open the Event subpage.
Ensure that Table is selected in the Trigger On list.
Enter oe.orders in the Table (Schema.Table) field.
Select After for Fire Trigger.
Select Insert for Event. In this example, only Insert should be selected because the messages track new orders, not changes to existing orders.
Click Advanced.
Select Trigger for each row.
Enter OLD in the Old as field in the Referencing section.
Enter NEW in the New as field in the Referencing section.
Click OK to create the trigger.
Note:
You can also use theCREATE TRIGGER SQL statement to create a trigger.Complete the steps in "Task 4: Configuring a Messaging Client to Dequeue Messages" to continue this extended example.
Configure a mechanism to dequeue the messages in your messaging system. Typically, an application dequeues and processes messages that were created by another application. For simplicity, this example creates a PL/SQL procedure called dequeue_orders to dequeue messages that include the order ID and order date of an order. You call the procedure to dequeue messages in this example, but an application can run such a procedure periodically.
To configure a messaging client to dequeue messages:
Grant EXECUTE privilege on the SYS.DBMS_STREAMS_MESSAGING package to the Oracle Streams administrator at the ii2.example.com database. See Step 1 in "Task 3: Configuring a Message Enqueuing Mechanism" for an example that grants this privilege to the Oracle Streams administrator in the ii1.example.com database.
On a command line, open SQL*Plus and connect to the ii2.example.com database as the Oracle Streams administrator.
See Oracle Database 2 Day DBA for more information about starting SQL*Plus.
Create a messaging client to enable the Oracle Streams administrator to dequeue messages from the streams_queue queue:
BEGIN
  DBMS_STREAMS_ADM.ADD_MESSAGE_RULE (
    message_type   => 'strmadmin.order_id_date',
    rule_condition => ':MSG.ORDER_ID > 0',
    streams_type   => 'DEQUEUE',
    streams_name   => 'strmadmin',
    queue_name     => 'strmadmin.streams_queue');
END;
/
The user name of the Oracle Streams administrator must be specified for the streams_name parameter. In this example, the user name of the Oracle Streams administrator is strmadmin.
A messaging client uses rules to determine which messages to dequeue. In this example, the rule for the messaging client specifies that all messages with an order_id greater than zero should be dequeued. So, with this rule, the messaging client will dequeue all new messages of type strmadmin.order_id_date that appear in the strmadmin.streams_queue queue.
In Oracle Enterprise Manager, log in to the ii2.example.com database as the Oracle Streams administrator.
Go to the Database Home page.
Click Schema to open the Schema subpage.
Click Procedures in the Programs section.
On the Procedures page, click Create.
On the Create Procedure page, enter dequeue_orders in the Name field.
Ensure that strmadmin is entered in the Schema field.
Delete the sample text in the Source field.
Enter the following in the Source field:
AS
  msg            ANYDATA;
  user_msg       strmadmin.order_id_date;
  num_var        PLS_INTEGER;
  more_messages  BOOLEAN := TRUE;
  navigation     VARCHAR2(30);
BEGIN
  navigation := 'FIRST MESSAGE';
  WHILE (more_messages) LOOP
    BEGIN
      DBMS_STREAMS_MESSAGING.DEQUEUE(
        queue_name   => 'strmadmin.streams_queue',
        streams_name => 'strmadmin',
        payload      => msg,
        navigation   => navigation,
        wait         => DBMS_STREAMS_MESSAGING.NO_WAIT);
      IF msg.GETTYPENAME() = 'STRMADMIN.ORDER_ID_DATE' THEN
        num_var := msg.GETOBJECT(user_msg);
        DBMS_OUTPUT.PUT_LINE('Order ID: ' || user_msg.order_id);
        DBMS_OUTPUT.PUT_LINE('Order Date: ' || user_msg.order_date);
      END IF;
      navigation := 'NEXT MESSAGE';
      COMMIT;
    EXCEPTION WHEN SYS.DBMS_STREAMS_MESSAGING.ENDOFCURTRANS THEN
                navigation := 'NEXT TRANSACTION';
              WHEN DBMS_STREAMS_MESSAGING.NOMOREMSGS THEN
                more_messages := FALSE;
                DBMS_OUTPUT.PUT_LINE('No more messages.');
              WHEN OTHERS THEN
                RAISE;
    END;
  END LOOP;
END;
Click OK.
Complete the steps in "Task 5: Enqueuing Messages" to continue this extended example.
Note:
You can also use theCREATE PROCEDURE SQL statement to create a procedure.The example in "Task 3: Configuring a Message Enqueuing Mechanism" created a trigger. The trigger enqueues a message with information about an order that was inserted into the oe.orders table into the strmadmin.streams_queue queue. So, you can enqueue messages into the strmadmin.streams_queue queue by inserting rows into the oe.orders table.
To insert rows into the oe.orders table:
On a command line, open SQL*Plus and connect to the ii1.example.com database as oe user.
See Oracle Database 2 Day DBA for more information about starting SQL*Plus.
In SQL*Plus, insert rows into the oe.orders table:
INSERT INTO oe.orders VALUES(3000, SYSDATE, 'direct', 116, 0, 4000.00, 153, NULL);

INSERT INTO oe.orders VALUES(3001, SYSDATE, 'direct', 117, 5, 5000.00, 163, NULL);

INSERT INTO oe.orders VALUES(3002, SYSDATE, 'direct', 118, 7, 6000.00, 159, NULL);
In SQL*Plus, commit your changes:
COMMIT;
Complete the steps in "Task 6: Dequeuing Messages" to continue this extended example.
The example in "Task 5: Enqueuing Messages" enqueues messages into the strmadmin.streams_queue queue in the ii1.example.com database. After messages are enqueued, the propagation configured in "Task 2: Configuring the Queues and Propagation Between Them" sends the messages to the strmadmin.streams_queue queue in the ii2.example.com database.
This example dequeues the messages from the queue in the ii2.example.com database using the dequeue_orders procedure created in "Task 4: Configuring a Messaging Client to Dequeue Messages".
To dequeue messages:
Optionally, verify that the messages have arrived in the strmadmin.streams_queue queue at ii2.example.com before you attempt to dequeue them. It might take time for the propagation to send messages from the queue at ii1.example.com to the queue at ii2.example.com. See "Viewing the Messages in a Queue" for instructions.
Three messages should appear on the Messages page. Each message contains information about an order you inserted into the oe.orders table in "Task 5: Enqueuing Messages".
On a command line, open SQL*Plus and connect to the ii2.example.com database as the Oracle Streams administrator.
See Oracle Database 2 Day DBA for more information about starting SQL*Plus.
In SQL*Plus, run the dequeue_orders procedure:
SET SERVEROUTPUT ON
exec dequeue_orders;
The output will be similar to the following:
Order ID: 3000
Order Date: 01-FEB-07 01.47.48.000000000 PM
Order ID: 3001
Order Date: 01-FEB-07 01.47.57.000000000 PM
Order ID: 3002
Order Date: 01-FEB-07 01.48.04.000000000 PM
No more messages.

PL/SQL procedure successfully completed.
You can configure message notifications that alert applications or users when a message of interest is enqueued.
The example in this topic illustrates how you can use message notifications to enable two applications to communicate with each other. In this example, the applications communicate in the following way:
The first application determines various parameters that must be set in the second application and the values for these parameters.
The first application enqueues messages that contain the following attributes:
parameter: Specifies the parameter to set in the second application
value: Specifies the parameter value
Message notification alerts the second application that there are new messages in the queue.
The second application dequeues the messages and sets the parameters to the values in the messages.
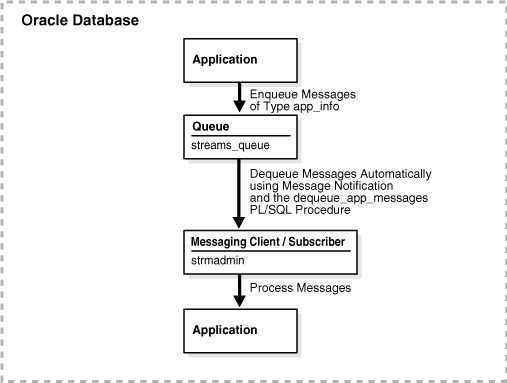
For simplicity, this example does not create the two applications. Instead, it illustrates how to configure a message notification and how message notification can be used to dequeue messages of interest automatically when they are enqueued.
Figure 9-2 provides an overview of the messaging environment created in this example.
Figure 9-2 Sample Messaging Environment That Uses Message Notification
Note:
You can also configure message notification in an environment that sends messages between databases. See "Tutorial: Sending Messages Between Oracle Databases" for an example of an environment that sends messages between databases.To configure a message notification:
See Also:
Oracle Streams Advanced Queuing User's Guide for detailed information about message notification features
Create a user-defined type to define the information that you want to track for the applications. This example creates the strmadmin.app_info type for messages that will contain a parameter and a value.
To create the strmadmin.app_info type:
Prepare your environment for messaging if you have not already done so. See "Preparing for Messaging".
In Oracle Enterprise Manager, log in to the database as the Oracle Streams administrator.
Go to the Database Home page.
Click Schema to open the Schema subpage.
Click Object Types in the User Defined Types section.
On the Object Types page, click Create to open the Create Object Type page.

Enter app_info in the Name field.
Ensure that strmadmin is selected in the Schema field.
Ensure that Predefined Type is selected for Datatype in the Attributes section.
Click Add in the Attributes section to open the Add Predefined Type Attributes page.

To add the first attribute to the app_info type:
Enter parameter in the Name field.
Select VARCHAR2 for Type.
Enter 20 in the Length field.
Click OK.
On the Create Object Type page, ensure that Predefined Type is selected for Datatype in the Attributes section.
Click Add in the Attributes section to open the Add Predefined Type Attributes page.
To add the next attribute to the app_info type:
Enter value in the Name field.
Select NUMBER for Type.
Enter 12 in the Length field.
Click OK.
On the Create Object Type page, click OK to create the type.
Complete the steps in "Task 2: Configuring a Queue and a Messaging Client" to continue this extended example.
Note:
You can also use theCREATE TYPE SQL statement to create a type.Create a queue table and a queue to store the messages that the first application will generate for the second application. After the queue is created, message notification requires a consumer who can dequeue messages from the queue. In this example, a messaging client is the consumer who can dequeue messages from the streams_queue queue.
To configure a queue and a messaging client:
Create a queue named streams_queue in the schema of the Oracle Streams administrator. See "Creating an ANYDATA Queue" for instructions.
On a command line, open SQL*Plus and connect to the database as the Oracle Streams administrator.
See Oracle Database 2 Day DBA for more information about starting SQL*Plus.
Create a messaging client to enable the Oracle Streams administrator to dequeue messages from the streams_queue queue:
BEGIN
  DBMS_STREAMS_ADM.ADD_MESSAGE_RULE (
    message_type   => 'strmadmin.app_info',
    rule_condition => ':MSG.VALUE >= 0',
    streams_type   => 'DEQUEUE',
    streams_name   => 'strmadmin',
    queue_name     => 'strmadmin.streams_queue');
END;
/
The user name for the Oracle Streams administrator must be specified for the streams_name parameter. In this example, the user name for the Oracle Streams administrator is strmadmin. The name of the new messaging client is also strmadmin.
A messaging client uses rules to determine which messages to dequeue. In this example, the rule for the messaging client specifies that all messages with a value greater than zero should be dequeued. So, with this rule, the messaging client will dequeue all new messages of type strmadmin.app_info that appear in strmadmin.streams_queue because all parameter values are greater than or equal to zero.
Complete the steps in "Task 3: Configuring a Mechanism for Dequeuing Messages" to continue this extended example.
In this extended example, the second application must be able to dequeue messages from the streams_queue queue. For simplicity, this example creates a PL/SQL procedure called dequeue_app_messages to dequeue messages of type strmadmin.app_info. This procedure uses the messaging client created in "Task 2: Configuring a Queue and a Messaging Client" to dequeue messages.
To configure a mechanism for dequeuing messages:
Grant the EXECUTE privilege on the DBMS_AQ package to the Oracle Streams administrator.
This example configures a procedure that runs the DEQUEUE procedure in the DBMS_AQ package. The user who runs this procedure must have explicit EXECUTE privilege on the package that contains the procedure. The privilege cannot be granted through a role. Therefore, the Oracle Streams administrator must be granted explicit EXECUTE privilege on the package.
Log in to Enterprise Manager as an administrative user who can grant privileges to the strmadmin user.
Go to the Server subpage.
Click Users in the Security section.
The Users page appears.
Select the STRMADMIN user.
Click Edit.
The General subpage of the Edit User page appears.
Click Object Privileges to open the Object Privileges subpage.

Select Package in the Select Object Type list.
Click Add to open the Add Package Object Privileges page.

Enter SYS.DBMS_AQ in the Select Package Objects field.
Move EXECUTE from the Available Privileges list to the Selected Privileges list.
Click OK to add the privilege.
Click Apply to grant the privilege.
Note:
You can also use theGRANT SQL statement to grant privileges to a user.Create a PL/SQL procedure that dequeues messages.
In Oracle Enterprise Manager, log in to the database as the Oracle Streams administrator.
Go to the Database Home page.
Click Schema to open the Schema subpage.
Click Procedures in the Programs section.
On the Procedures page, click Create.
On the Create Procedure page, enter dequeue_app_messages in the Name field.
Ensure that strmadmin is entered in the Schema field.
Delete the sample text in the Source field.
Enter the following in the Source field:
(
  context  ANYDATA,
  reginfo  SYS.AQ$_REG_INFO,
  descr    SYS.AQ$_DESCRIPTOR)
AS
  dequeue_options     DBMS_AQ.DEQUEUE_OPTIONS_T;
  message_properties  DBMS_AQ.MESSAGE_PROPERTIES_T;
  message_handle      RAW(16);
  message             ANYDATA;
  app_message         strmadmin.app_info;
  rc                  PLS_INTEGER;
BEGIN
  -- Get the message identifier and consumer name from the descriptor
  dequeue_options.msgid := descr.msg_id;
  dequeue_options.consumer_name := descr.consumer_name;
  -- Dequeue the message
  DBMS_AQ.DEQUEUE(
    queue_name         => descr.queue_name,
    dequeue_options    => dequeue_options,
    message_properties => message_properties,
    payload            => message,
    msgid              => message_handle);
  rc := message.getobject(app_message);
  COMMIT;
END;
A message notification PL/SQL procedure must have the following signature:
PROCEDURE procedure_name(
  context  IN  ANYDATA,
  reginfo  IN  SYS.AQ$_REG_INFO,
  descr    IN  SYS.AQ$_DESCRIPTOR);
Here, procedure_name stands for the name of the procedure. The procedure is a PLSQLCALLBACK data structure that specifies the user-defined PL/SQL procedure to be invoked on message notification.
The procedure in this example is a simple notification procedure that dequeues a message of type strmadmin.app_info type using the message identifier and consumer name sent by the notification.
Click OK to create the procedure.
Note:
You can also use theCREATE PROCEDURE SQL statement to create a procedure.Complete the steps in "Task 4: Configuring Message Notification" to continue this extended example.
In this extended example, message notification invokes the strmadmin.dequeue_app_messages procedure when a new message is enqueued into the strmadmin.streams_queue queue. This procedure dequeues the new message or messages. After dequeuing, an application can process the messages in any customized way. In this example, the second application uses the information in the messages to set application parameter values. For simplicity, this example does not configure the second application.
To configure message notification that invokes a procedure:
On a command line, open SQL*Plus and connect to the database as the Oracle Streams administrator.
See Oracle Database 2 Day DBA for more information about starting SQL*Plus.
Set the message notification to invoke the strmadmin.dequeue_app_messages procedure when messages are enqueued and they can be dequeued by the strmadmin messaging client:
BEGIN
  DBMS_STREAMS_ADM.SET_MESSAGE_NOTIFICATION (
    streams_name         => 'strmadmin',
    notification_action  => 'strmadmin.dequeue_app_messages',
    notification_type    => 'PROCEDURE',
    include_notification => TRUE,
    queue_name           => 'strmadmin.streams_queue');
END;
/
Complete the steps in "Task 5: Enqueuing Messages and Checking for Message Notification" to continue this extended example.
In this extended example, one application enqueues messages that are processed by a second application. For simplicity, this example enqueues messages manually. After the messages are enqueued, you can ensure that they have been dequeued automatically through message notification.
To enqueue messages and check for message notification:
On a command line, open SQL*Plus and connect to the database as the Oracle Streams administrator.
See Oracle Database 2 Day DBA for more information about starting SQL*Plus.
Enqueue messages into the strmadmin.streams_queue queue:
DECLARE
  msg    strmadmin.app_info;
BEGIN
  msg := strmadmin.app_info(
            parameter => 'THRESHOLD',
            value     => 1000);
  DBMS_STREAMS_MESSAGING.ENQUEUE (
    queue_name   => 'strmadmin.streams_queue',
    payload      => ANYDATA.CONVERTOBJECT(msg));
  COMMIT;
END;
/

DECLARE
  msg    strmadmin.app_info;
BEGIN
  msg := strmadmin.app_info(
            parameter => 'MIN_WAIT',
            value     => 1);
  DBMS_STREAMS_MESSAGING.ENQUEUE (
    queue_name   => 'strmadmin.streams_queue',
    payload      => ANYDATA.CONVERTOBJECT(msg));
  COMMIT;
END;
/

DECLARE
  msg    strmadmin.app_info;
BEGIN
  msg := strmadmin.app_info(
            parameter => 'BUFFER_SIZE',
            value     => 30);
  DBMS_STREAMS_MESSAGING.ENQUEUE (
    queue_name   => 'strmadmin.streams_queue',
    payload      => ANYDATA.CONVERTOBJECT(msg));
  COMMIT;
END;
/
Optionally, view the messages in the streams_queue queue, and verify that they have been dequeued automatically using message notification. See "Viewing the Messages in a Queue" for instructions.
When the message notification configured in this example is working properly, you should see one of the following on the Messages page:
One or more of the enqueued messages might appear with Processed in the Consumers in Different States field. A Processed value in this field means that the message has been dequeued by all consumers.
No messages appear in the queue. Eventually, processed messages are deleted from a queue automatically. If no messages appear, then the enqueued messages were dequeued by message notification and then deleted automatically.
You can use Enterprise Manager to modify some properties of an existing queue, including the following properties:
Maximum Retries: The number of dequeuing attempts allowed on a message before the message is moved to the exception queue. If there is poor connectivity in your messaging environment, then a connection might be lost while an application is in the process of dequeuing messages. In such environment, you might increase the number of maximum retries allowed so that applications can try to dequeue messages several times before the messages are moved to the exception queue.
Retry Delay: The amount of time after which a message is scheduled for processing again after an application rollback. If there is poor connectivity in your messaging environment, then you might want applications to wait for a set period of time after a failed attempt to dequeue messages. In such environments, you might increase the retry delay setting to specify the amount of time to wait.
Retention Time: The amount of time that a message is retained in a queue after the message has been dequeued by all of its consumers. If you want to track messages that have been consumed, then you might set a retention time that enables you to record information about the messages that have been stored in the queue.
You can set these properties to values that work best with the applications that dequeue messages from the queue.
To modify a queue:
In Oracle Enterprise Manager, log in to the database as the Oracle Streams administrator.
Go to the Database Home page.
Click Data Movement to open the Data Movement subpage.
In the Streams section, click Manage Advanced Queues to open the Manage Advanced Queues page.
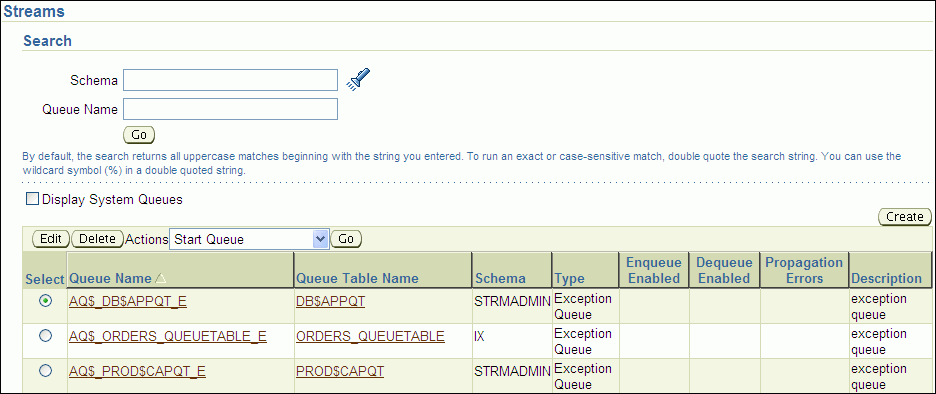
Select the queue to modify. If necessary, use the search tool to find the queue, and then select it.
Click Edit to open the Edit Queue page.
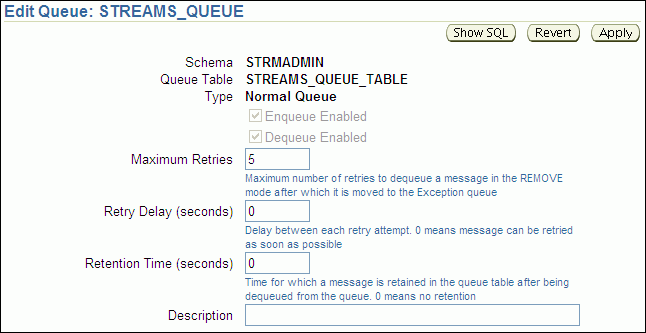
Modify one or more queue properties.
Click Apply to save your changes.
Note:
You can also use theDBMS_AQADM.ALTER_QUEUE procedure to modify a queue.You can use Enterprise Manager to modify some storage options of an existing queue table. Changing the storage options for a queue table can improve the performance of the queues that use the queue table.
To modify a queue table:
In Oracle Enterprise Manager, log in to the database as the Oracle Streams administrator.
Go to the Database Home page.
Click Data Movement to open the Data Movement subpage.
Click Manage Advanced Queues.
In the Related Links section, click Queue Tables to open the Queue Tables page.
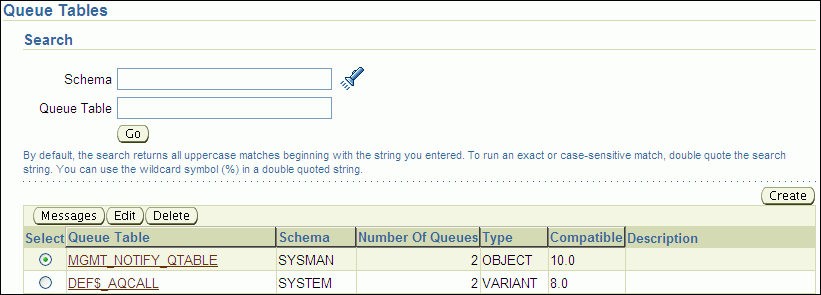
Select the queue table to modify.
Click Edit.
The Edit Queue Table page appears, showing the General subpage.
Click Storage to open the Storage subpage or LOB Storage to open the LOB Storage subpage.
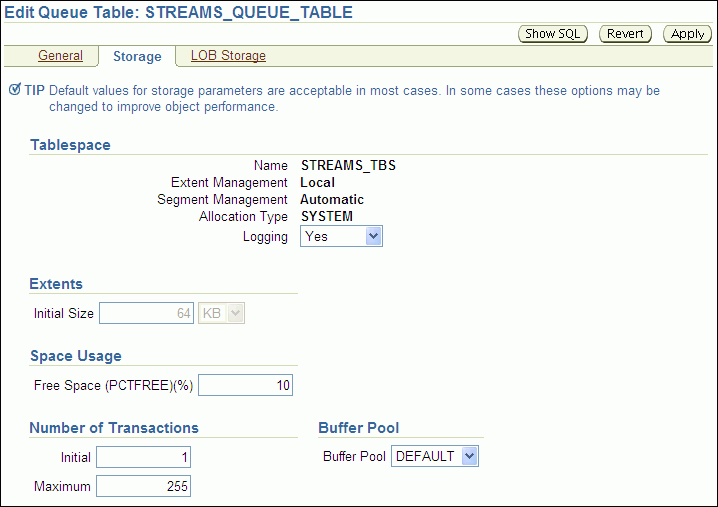
Modify one or more queue table properties.
Click Apply to save your changes.
Note:
You can also use theDBMS_AQADM.ALTER_QUEUE_TABLE procedure to modify a queue table.You can use Enterprise Manager to modify the schedule of an existing propagation. A propagation schedule determines when and how often the propagation sends messages from one queue to another and how long each propagation lasts. You can modify the following schedule options:
Latency: The amount of time to wait before new messages in a completely propagated queue are propagated
Duration of the Propagation: The amount of time that each individual propagation lasts
Next Time: The amount of time in between individual propagations
Typically, you modify a propagation schedule to improve the performance of a propagation in your messaging environment. The default settings for these options are usually the best settings. However, you can try different settings for these options to achieve the best performance.
To modify a propagation:
In Oracle Enterprise Manager, log in to the database as the Oracle Streams administrator.
Go to the Database Home page.
Click Data Movement to open the Data Movement subpage.
Click Manage Advanced Queues to open the Manage Advanced Queues page.

Select the source queue for the propagation that you want to modify. The source queue is the queue from which the propagation sends messages to a destination queue.
Select Propagation Schedules in the Actions list.
Click Go to open the Propagation Schedules page.

Select the propagation schedule to modify.
Click Edit to open the Edit Propagation Schedule page.
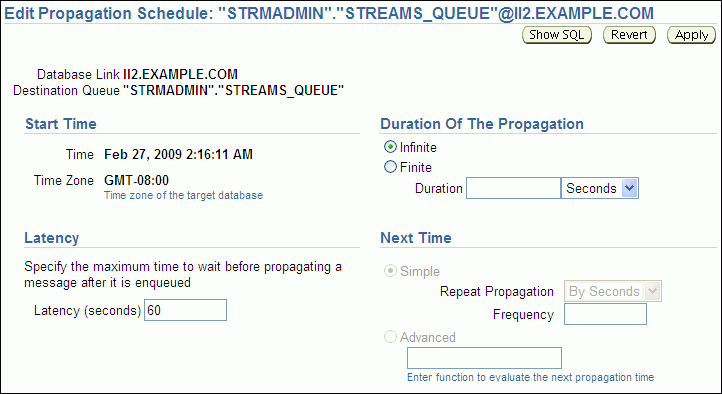
Modify one or more schedule options.
Click Apply to save your changes.
Note:
You can also use theDBMS_AQADM.ALTER_PROPAGATION_SCHEDULE procedure to modify a propagation schedule.This section describes using Enterprise Manager to display information about a messaging environment. This section contains instructions for viewing the messages in a queue, queue statistics, and queue consumers.
The following topics describe monitoring a messaging environment:
See Also:
You can view the messages in a queue to ensure that an application is enqueuing messages correctly or to see which messages are currently ready to be dequeued or propagated to another queue.
To view the messages currently stored in a queue:
In Oracle Enterprise Manager, log in to the database as the Oracle Streams administrator.
Go to the Database Home page.
Click Data Movement to open the Data Movement subpage.
Click Manage Advanced Queues to open the Manage Advanced Queues page.
Select the queue that contains the messages. If necessary, use the search tool to find the queue, and then select it.
Select Messages in the Actions list.
Click Go.
On the Messages page, click Go. The messages are listed.
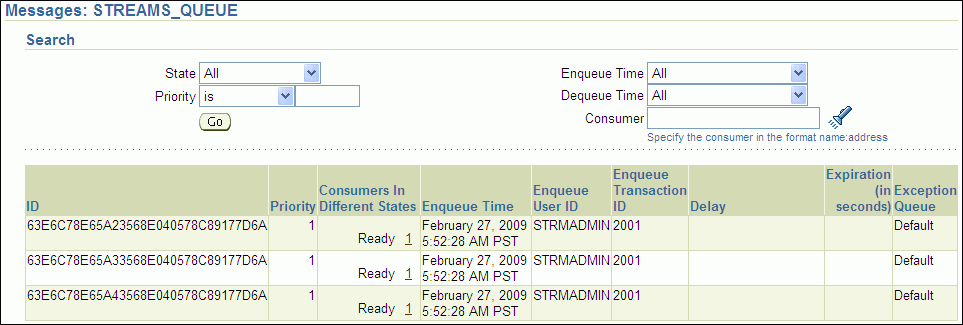
Click the number link in the Consumers In Different States field to view the consumers of a message. A consumer might be a propagation that sends the message to a different queue or an application that dequeues the message.
See Also:
If you are using persistent messaging mode, then messages are stored in queue table on hard disk. This topic describes viewing statistics for messages that were enqueued in persistent mode into a persistent queue.
To view persistent queue statistics:
In Oracle Enterprise Manager, log in to the database as the Oracle Streams administrator.
Go to the Database Home page.
Click Data Movement to open the Data Movement subpage.
Click Manage Advanced Queues to open the Manage Advanced Queues page.
Select the queue that contains the messages. If necessary, use the search tool to find the queue, and then select it.
Select Queue Statistics in the Actions list.
Click Go.
On the Queue Statistics page, click Message Statistics to view the persistent queue statistics for the queue.
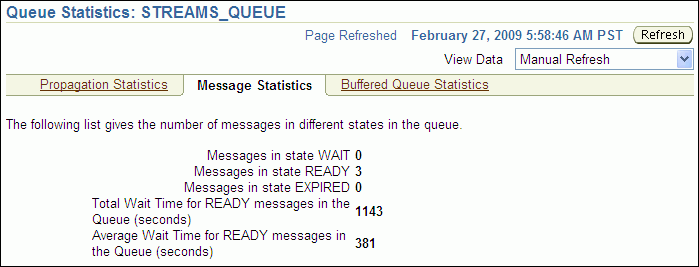
The message statistics show the number of messages in each state in the persistent queue. They also show the total wait time and the average wait time for messages to be dequeued.
Note:
Messages can also be enqueued in buffered mode. In this case, the messages are stored in memory in a buffered queue. See "Viewing Buffered Queue Statistics" for information about viewing statistics for these messages.
You can also query the V$AQ dynamic performance view for queue statistics.
See Also:
Consumers are configured to dequeue messages from a specific queue. In a messaging environment, consumers are represented by subscribers to a queue, and multiple consumers might use a single subscriber.
Consumers can be:
Applications or users that dequeue and process messages
Propagations that send messages from one queue to another
Apply processes that can dequeue messages for custom processes in a messaging environment or dequeue changes to database objects in a replication environment
To view the consumers who can dequeue messages from a specific queue:
In Oracle Enterprise Manager, log in to the database as the Oracle Streams administrator.
Go to the Database Home page.
Click Data Movement to open the Data Movement subpage.
Click Manage Advanced Queues to open the Manage Advanced Queues page.
Select the queue. If necessary, use the search tool to find the queue, and then select it.
Select Subscribers in the Actions list.
Click Go to open the Subscribers page.
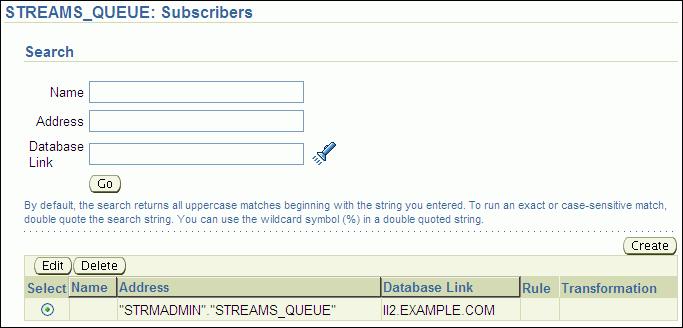
The Subscribers page includes the following information about each subscriber to the queue:
The Name field contains the name of the subscriber.
The Address field is typically populated if the subscriber is a propagation that sends messages to another queue. The Address field shows the name of the queue that receives the messages.
The Database Link field shows the database link to a remote database if the subscriber is at the remote database.
The Rule field shows the rule used by the subscriber. Rules can determine which messages are dequeued by the subscriber. Some subscribers do not use rules.
The Transformation field shows the transformation used by the subscriber. Transformations modify messages while they are being dequeued. Some subscribers do not use transformations.
Note:
You can also query theALL_QUEUE_SUBSCRIBERS data dictionary to view the consumers who can dequeue messages.See Also:
This section describes the most common problems in a messaging environment. It also describes how to correct these problems.
The following topics describe troubleshooting a messaging environment:
If a user who does not have the required privileges attempts to enqueue or dequeue messages, then Oracle Database returns the following error:
ORA-01031: insufficient privileges
The enqueue or dequeue operation fails when Oracle Database returns this message. To correct the problem, grant ENQUEUE or DEQUEUE privileges on the queue to the user.
To grant ENQUEUE or DEQUEUE privileges to a user:
On a command line, open SQL*Plus and connect to the database as an administrative user, such as the Oracle Streams administrator or SYSTEM.
See Oracle Database 2 Day DBA for more information about starting SQL*Plus.
Run the GRANT_QUEUE_PRIVILEGE procedure in the DBMS_AQADM package to grant the required queue privileges to the user.
For example, to grant the ENQUEUE privilege to the hr user on the strmadmin.streams_queue queue, run the following procedure:
BEGIN
   DBMS_AQADM.GRANT_QUEUE_PRIVILEGE (
      privilege  => 'ENQUEUE',
      queue_name => 'strmadmin.streams_queue',
      grantee    => 'hr');
END;
/
To grant the DEQUEUE privilege to the hr user on the strmadmin.streams_queue queue, run the following procedure:
BEGIN
   DBMS_AQADM.GRANT_QUEUE_PRIVILEGE (
      privilege  => 'DEQUEUE',
      queue_name => 'strmadmin.streams_queue',
      grantee    => 'hr');
END;
/
If there are no consumers for a message when a user or application tries to enqueue it, then Oracle Database returns the following error:
ORA-24033: no recipients for message
The message is not enqueued when Oracle Database returns this message.
To correct the problem:
Configure at least one consumer for the messages.
Enqueue the messages.
Consumers can be:
Applications or users that dequeue and process messages
Propagations that send messages from one queue to another
Apply processes that can dequeue messages for custom processes in a messaging environment or dequeue changes to database objects in a replication environment
Messaging clients that dequeue messages and pass them to an application
A propagation uses the privileges of the database user who owns its source queue when it sends messages. If the source queue owner cannot access the database link used by the propagation, then Oracle Database returns the following error:
ORA-02019: connection description for remote database not found
The messages are not propagated when Oracle Database returns this message. The easiest way to correct this problem is to delete and re-create the database link so that the source queue owner can access it.
To delete and re-create a database link:
In Oracle Enterprise Manager, log in to the database as an administrative user, such as the Oracle Streams administrator or SYSTEM.
Go to the Database Home page.
Click Schema to open the Schema subpage.
Click Database Links in the Database Objects section.
The Database Links page appears.
Use the search tool to list the database link you want to delete and re-create.
Select the database link.
Click Delete.
Click Yes on the confirmation page to delete the database link.
Follow the instructions in "Tutorial: Creating a Database Link" to re-create the database link.
To ensure that the source queue owner for the propagation has access to the database link, specify this user as the fixed user in the Connect As section when you create the database link.
See Also:
Oracle Database Administrator's Guide for more information about database links
A message can remain in a queue after it has been dequeued for the following reasons:
One or more consumers of the message have not yet dequeued it. A message is not removed from a queue until all of its consumers have dequeued it.
The message has not been cleaned up by a background process. After all of the consumers of a message have dequeued it, the message remains in the queue until a background process removes it automatically.
If you see messages in a queue that were dequeued by a consumer, then you can use Enterprise Manager to check on the consumers for a message and to determine whether all of the consumers for a message have dequeued it.
To check on messages in a queue:
Follow the instructions in "Viewing the Consumers Who Can Dequeue Messages" to view the consumers who can dequeue the messages. If there are multiple consumers for a message, then some consumers might not have dequeued the message yet.
Follow the instructions in "Viewing the Messages in a Queue". If the Consumers in Different States field shows PROCESSED for a message, then all of the consumers of the message have dequeued it. In this case, the message remains in the queue until the background process removes it automatically.