2 Installation
Follow these steps to install Oracle R Enterprise on your system:
-
Make sure that the Prerequisites are satisfied.
-
-
Install Client on Microsoft Windows, Install Client on Linux, Install Client on Solaris, or Install Client on AIX.
-
Install Server on Microsoft Windows, Install Server on Linux, Install Server on Solaris, or Install Server on AIX.
Client and server are not required to run on the same platform. For example, a client on Windows can connect to a server on Linux, or a client on Linux can connect to a server on Solaris.
Note:
Client and Server must be the same release of Oracle R Enterprise. For example, if you install Oracle R Enterprise 1.2 Server, you must connect to it using Oracle R Enterprise 1.2 Client. -
-
If you have Oracle R Enterprise 1.0 installed, you can Upgrade Oracle R Enterprise.
You can upgrade from the 1.0 release version of Oracle R Enterprise only. You cannot upgrade Beta versions.
-
If necessary, you can Uninstall Oracle R Enterprise.
Note:
Before you install Oracle R Enterprise, you should go to Oracle R Enterprise athttp://www.oracle.com/technetwork/database/options/advanced-analytics/r-enterprise/index.html and check to see that you have the latest version. The version packaged with Oracle Database 12c Release 1 (12.1) may not be the latest version of Oracle R Enterprise.Prerequisites
First decide which of the Oracle R Enterprise Supported Configurations that you will use.
Then install the required software before you install Oracle R Enterprise:
Linux, Windows, Solaris, and/or AIX
Verify that one of these operating systems is installed on both client and server. Client and server can be installed on different operating systems.
-
Linux x86-64
-
Oracle Linux Release 5 Update 6 or higher
-
Red Hat Linux 5 Update 6 or higher
To download Oracle Linux Release 5 Update 6 Media Pack for x86_64 (64 bit), go to
http://www.oracle.com/us/technologies/linux/index.html. -
-
Microsoft Windows XP, Vista, or Windows 7, 32-bit or 64-bit
-
64-bit Solaris 10 or higher for both SPARC and x386 (Intel) platforms
-
IBM AIX 5.3 or higher (64-Bit)
Oracle R Enterprise is also supported on
-
Oracle Exadata running Oracle Linux or Solaris
-
SPARC SuperCluster
R
On your client or server system, download and install R 2.13.2. You can download R from http://www.r-project.org or any source that provides R.
Note:
Oracle R Enterprise is certified with R 2.13.2 only.You must install R on both the client and the server.
For Windows, the version of R that you download from CRAN works with Oracle R Enterprise. For Linux, Oracle Exadata, Solaris, and IDM AIX, the free Oracle R Distribution was created to work with Oracle R Enterprise; see Oracle R Distribution for more information.
Installation of R depends on the platform:
Oracle R Distribution
Oracle R Distribution is Oracle's free distribution of the open source R environment for Linux, Solaris, and AIX.
It is recommended that you use Oracle R Distribution with Oracle R Enterprise for these reasons:
-
Oracle R Distribution has been enhanced for faster performance by taking advantage of hardware specific math library implementations.
-
Oracle R Distribution has been compiled with the flags that are required by Oracle R Enterprise.
-
Oracle offers support for users of Oracle R Distribution on Linux, AIX. and Solaris 64 bit (SPARC and Intel) platforms.
For information about Oracle R Distribution, including an installation guide and download sites, go to http://www.oracle.com/technetwork/indexes/downloads/r-distribution-1532464.html.
Install R on Windows
Follow these steps to install R 2.13.2 on Windows:
-
Go to
http://www.r-project.org; click CRAN under the heading Download, Packages. -
Select a CRAN Mirror.
-
Click Download R for Windows.
-
Click base.
-
Under the heading Other builds, click Previous releases in the third bullet.
-
Click R 2.13.2 (September, 2011) to start the download.
When the download completes, double click R-2.13.2-win.exe to launch the Windows installer for R. Follow the instructions to complete the installation.
It is strongly recommended that you perform a full R installation on 64-bit Windows platforms, so that 64-bit R is installed. (The full R install for 64-bit Windows installs both 32-bit and 64-bit R.) The Oracle R Enterprise 64-bit Windows Server requires 64-bit R.
Install Oracle R Distribution on Linux
You can install R from CRAN at http://www.r-project.org or you can install Oracle R Distribution. If you install from CRAN, be sure to download R 2.13.2 (September, 2011).
It is recommended that you install Oracle R Distribution because it has been compiled with the correct flags for Oracle R Enterprise.
For an installation guide and download sites for Oracle R Distribution, go to http://www.oracle.com/technetwork/indexes/downloads/r-distribution-1532464.html.
This section describes how to install Oracle R Distribution on Oracle Linux or Red Hat Linux. To install Oracle R Distribution on Oracle Exadata Machine, see Install Oracle R Distribution on Oracle Exadata.
Go to http://public-yum.oracle.com/ and follow these steps to install R:
-
Install the yum repos as follows:
cd /etc/yum.repos.d
wget http://public-yum.oracle.com/public-yum-el5.repo
-
Open a text editor on the file just downloaded,
/etc/yum.repos.d/public-yum-el5.repo, and set "enabled=1" for[ol5_u6_base]and[el5_addons]. -
This step is optional.
Type the following commands in a shell to check that your yum repository is configured correctly:
sudo yum repolist
The output should look like this:
el5_addons                             |  951 B     00:00
ol5_u6_base                             | 1.2 kB     00:00
repo id              repo name                                status
base                 Red Hat Linux - Base                     enabled: 3,024
el5_addons           Enterprise Linux 5 - x86_64 - addons     enabled:    93
ol5_u6_base          Oracle Linux 5 - U6 - x86_64 - base      enabled: 4,551
Make sure that both the
el5_addonsandol5_u6_baserepos are listed. The list of repos can be different depending on the Linux version and current user's configuration of yum. -
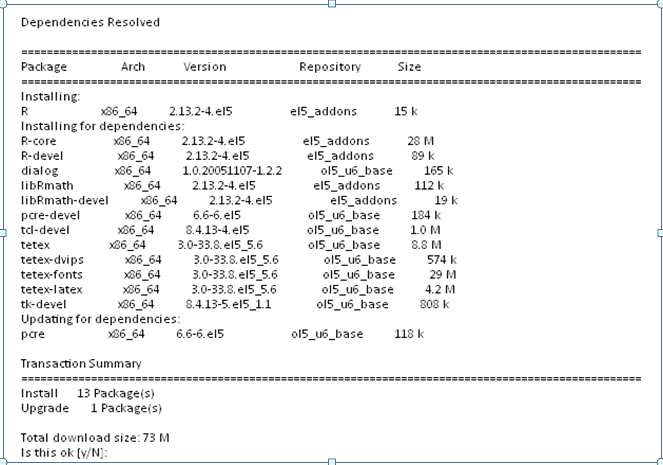
To install R, use the following command:
sudo yum install R.x86_64
If the installation is successful, you should see the following messages. The list of required packages may be longer (if you install ORE on Oracle Exadata) or shorter depending on your specific Linux environment and packages installed prior to this R installation.
Make sure to look for the keywords Dependencies Resolved.
Install Oracle R Distribution on Oracle Exadata
Oracle R Distribution is recommend for Oracle Exadata. For an installation guide and download sites for Oracle R Distribution, go to http://www.oracle.com/technetwork/indexes/downloads/r-distribution-1532464.html.
Using http://public-yum.oracle.com/ is the recommended way to install R on Oracle Exadata.
If you cannot use http://public-yum.oracle.com/, you can follow these steps to install R using RPMs.
Note:
These directions work for Oracle Linux Release 5 only.The required RPMs are in one of these locations
-
http://public-yum.oracle.com/repo/EnterpriseLinux/EL5/5/base/x86_64/ -
The three libMath RPMs
libSM-1.0.1-3.1.x86_64.rpm,libRmath-static-2.13.2-4.el5.x86_64.rpm, andlibRmath-2.13.2-4.el5.x86_64.rpmare inhttp://public-yum.oracle.com/repo/EnterpriseLinux/EL5/addons/x86_64/
Follow these steps to install Oracle R Distribution on Oracle Exadata:
-
Make sure that the following RPMs are installed. If any are missing, download and install them:
rpm -Uvh libsmi-devel-0.4.5-2.el5.x86_64.rpm
rpm -Uvh libsmi-0.4.5-2.el5.x86_64.rpm
rpm -Uvh libSM-devel-1.0.1-3.1.x86_64.rpm
rpm -Uvh libsmbclient-devel-3.0.33-3.28.el5.x86_64.rpm
rpm -Uvh libsmbclient-3.0.33-3.28.el5.x86_64.rpm
rpm -Uvh libSM-1.0.1-3.1.x86_64.rpm
rpm -Uvh libRmath-static-2.13.2-4.el5.x86_64.rpm
rpm -Uvh libRmath-devel-2.13.2-4.el5.x86_64.rpm
rpm -Uvh libRmath-2.13.2-4.el5.x86_64.rpm
rpm -Uvh libpng-1.2.10-7.1.el5_3.2.x86_64.rpm
rpm -Uvh libjpeg-6b-37.x86_64.rpm
rpm -Uvh libICE-devel-1.0.1-2.1.x86_64.rpm
rpm -Uvh libICE-1.0.1-2.1.x86_64.rpm
rpm -Uvh libgssapi-0.10-2.x86_64.rpm
rpm -Uvh libgsf-1.24.1-6.1.x86_64.rpm
rpm -Uvh libFS-1.0.0-3.1.x86_64.rpm
rpm -Uvh libfontenc-1.0.2-2.2.el5.x86_64.rpm
-
Download and install these RPMs in the order in which they are listed:
rpm -Uvh cairo-1.2.4-5.el5.x86_64.rpm
rpm -Uvh libtiff-3.8.2-7.el5_3.4.x86_64.rpm
rpm -Uvh bitstream-vera-fonts-1.20-7.noarch.rpm
rpm -Uvh pango-1.24.9-6.el5.x86_64.rpm
rpm -Uvh cups-libs-1.2.7-18.el5.x86_64.rpm
rpm -Uvh paps-0.6.6-19.el5.x86_64.rpm
rpm -Uvh atk-1.22.2-1.fc6.x86_64.rpm
rpm -Uvh hicolor-icon-theme-0.9-2.1.noarch.rpm
rpm -Uvh gtk2-2.10.4-20.el5.x86_64.rpm
rpm -Uvh poppler-0.5.4-4.4.el5_4.11.x86_64.rpm
rpm -Uvh poppler-utils-0.5.4-4.4.el5_4.11.x86_64.rpm
rpm -Uvh dbus-python-0.70-9.el5_4.x86_64.rpm
rpm -Uvh avahi-0.6.16-7.el5.x86_64.rpm
rpm -Uvh avahi-compat-libdns_sd-0.6.16-7.el5.x86_64.rpm
rpm -Uvh cups-1.2.7-18.el5.x86_64.rpm
rpm -Uvh netpbm-10.35.58-8.el5.x86_64.rpm
rpm -Uvh desktop-file-utils-0.10-7.x86_64.rpm
rpm -Uvh dialog-1.0.20051107-1.2.2.x86_64.rpm
rpm -Uvh ed-0.2-39.el5_2.x86_64.rpm
rpm -Uvh tetex-fonts-3.0-33.8.el5.x86_64.rpm
rpm -Uvh tetex-3.0-33.8.el5.x86_64.rpm
rpm -Uvh tetex-dvips-3.0-33.8.el5.x86_64.rpm
rpm -Uvh libFS-1.0.0-3.1.x86_64.rpm
rpm -Uvh xorg-x11-xfs-utils-1.0.2-4.x86_64.rpm
rpm -Uvh xorg-x11-font-utils-7.1-2.x86_64.rpm
rpm -Uvh ttmkfdir-3.0.9-23.el5.x86_64.rpm
rpm -Uvh chkfontpath-1.20.1-1.2.x86_64.rpm xorg-x11-xfs-1.0.2-4.x86_64.rpm
rpm -Uvh urw-fonts-2.3-6.1.2.noarch.rpm
rpm -Uvh ghostscript-8.15.2-9.11.el5.x86_64.rpm  ghostscript-fonts-5.50-13.1.2.noarch.rpm
rpm -Uvh netpbm-progs-10.35.58-8.el5.x86_64.rpm
rpm -Uvh tetex-latex-3.0-33.8.el5.x86_64.rpm
-
Finally download and install the core RPM for R:
rpm -Uvh R-core-2.13.2-4.el5.x86_64.rpm
Install R on Solaris
R for Solaris is available in two ways:
-
Oracle R Distribution is available for Solaris. Oracle R Distribution is compiled with the flags required for Oracle R Enterprise.
For an installation guide and download sites for Oracle R Distribution, go to
http://www.oracle.com/technetwork/indexes/downloads/r-distribution-1532464.html. -
Open-source R can be configured and built for Solaris using source code from CRAN. See the R Installation and Administration guide
http://cran.r-project.org/doc/manuals/R-admin.pdffor details.If you install from CRAN, be sure to download R 2.13.2 (September, 2011).
Install R on AIX
R for IBM AIX is available in two ways:
-
Oracle R Distribution is available for AIX. Oracle R Distribution is compiled with the flags required for Oracle R Enterprise.
For an installation guide and download sites for Oracle R Distribution, go to
http://www.oracle.com/technetwork/indexes/downloads/r-distribution-1532464.html. -
Open-source R can be configured and built for AIX using source code from CRAN. See the R Installation and Administration manual
http://cran.r-project.org/doc/manuals/R-admin.pdffor details.If you install from CRAN, be sure to download R 2.13.2 (September, 2011).
Oracle Database
Oracle R Enterprise 1.2 requires Oracle Database 12c Release 1 (12.1) Enterprise Edition; Oracle Database 12c Release 1 (12.1) can be installed on Oracle Linux, Red Hat Linux, Solaris SPARC or x386, SPARC SuperCluster, IBM AIX 64-bit, or Oracle Exadata running Oracle Linux or Solaris.
Install Oracle R Enterprise
After you verify that the Prerequisites are satisfied, install Oracle R Enterprise.
Before you install software, download the latest version as described in Download Oracle R Enterprise Software.
Note:
If you have media that contains Oracle R Enterprise, you may not have the latest version of the software; check to see if there is a later version at the download site.Oracle R Enterprise has two components, client and server:
-
Oracle R Enterprise client installation: Installs required packages used with the R engine on user's desktop to enable transparent interaction with data resident in Oracle Database 12c Release 1 (12.1). The client runs on Windows, Linux, Solaris, and AIX:
The client and the server must have the same version.
-
Oracle R Enterprise server installation: Installs required libraries and PL/SQL procedures to enable Oracle 12c Release 1 (12.1) to support an Oracle R Enterprise client. The server runs on Microsoft Windows, on an Oracle Linux or Red Hat Linux system, on an Oracle Exadata machine running Oracle Linux operating system, on Solaris, or on IBM AIX:
The client and the server must have the same version.
After you install the client and the server, you can start Oracle R Enterprise:
After you start Oracle R Enterprise, you can use the Oracle R Enterprise Samples to learn about using Oracle R Enterprise.
If startup fails or you encounter problems during installation, Troubleshoot the Installation.
Download Oracle R Enterprise Software
You can obtain the Zip archives that contain Oracle R Enterprise software in two ways:
Use Oracle Universal Installer (Server Only)
If you are connecting to Oracle Database 12c Release 1 (12.1), Oracle Universal Installer automatically copies the files required to install Oracle R Enterprise server to the directory
ORACLE_HOME/R/ORE1_2
All files to install the server are in this directory.
You must download client files, even if you install the client on the same system as the server, as described in Download from Oracle Technology Network.
Download from Oracle Technology Network
Oracle R Enterprise software is available for download from Oracle Technology Network. You must have a free Oracle Technology Network account in order to down load software. See http://www.oracle.com/technetwork/community/join/why-join/index.html for information.
To download software for Oracle R Enterprise, go to Oracle R Enterprise Downloads at http://www.oracle.com/technetwork/database/options/advanced-analytics/r-enterprise/ore-downloads-1502823.html.
Before you can download any files, you must accept the OTN License Agreement.
To download the latest software, click the links for your platform:
-
Microsoft Windows:
-
Oracle R Enterprise Client Packages for Windows Platform (includes client packages for both 32-bit and 64-bit architectures)
-
Oracle R Enterprise Client Supporting Packages for Windows Platform (includes client supporting packages for both 32-bit and 64-bit architectures)
-
Oracle R Enterprise Server Install for Oracle Database 12c Release 1 (12.1) on Windows 32-bit
-
Oracle R Enterprise Server Install for Oracle Database 12c Release 1 (12.1) on Windows 64-bit
-
-
Linux 64-bit:
-
Oracle R Enterprise Client Packages for Linux 64-bit Platform
-
Oracle R Enterprise Client Supporting Packages for Linux 64-bit Platform
-
Oracle R Enterprise Server Install for Oracle Database 12c Release 1 (12.1) on Linux 64-bit
-
-
Solaris SPARC 64-bit
-
Oracle R Enterprise Client Packages for Solaris SPARC 64-bit Platform
-
Oracle R Enterprise Client Supporting Packages for Solaris SPARC 64-bit Platform
-
Oracle R Enterprise Server Install for Oracle Database 12c Release 1 (12.1) on Solaris SPARC 64-bit
-
-
Solaris x386 64-bit
-
Oracle R Enterprise Client Packages for Solaris x386 64-bit Platform
-
Oracle R Enterprise Client Supporting Packages for Solaris x386 64-bit Platform
-
Oracle R Enterprise Server Install for Oracle Database 12c Release 1 (12.1) on Solaris x386 64-bit
-
-
IBM AIX 5.3 or higher on POWER Systems (64-Bit)
-
Oracle R Enterprise Client Packages for AIX 64-bit Platform
-
Oracle R Enterprise Client Supporting Packages for AIX 64-bit Platform
-
Oracle R Enterprise Server Install for Oracle Database 12c Release 1 (12.1) on AIX 64-bit
-
You must download the client or server software plus the supporting packages; for example to install the Client on Microsoft Windows, you must download Oracle R Enterprise Client Packages for Windows Platform and Oracle R Enterprise Client Supporting Packages for Windows Platform.
Click the link for the software that you require. Sign on using your Oracle Technology Network login.
When you download Windows software be sure to download the correct version of the Server software for your system.
When you download Solaris software be sure to download the correct version for your system.
A zip archive is downloaded for all platforms. Save the archive on your local system and unzip it.
Install Client on Microsoft Windows
Oracle R Enterprise client is supported on Microsoft Windows XP or later for 32-bit and 64-bit architectures. The client requires R 2.13.2.
To install the client, you must install two sets of packages:
-
The supporting R packages
DBI,ROracle, andpng -
The suite of Oracle R Enterprise packages:
OREbase,OREeda,OREgraphics,OREpredict,OREstats,ORExml, andORE
The downloads for Windows support both 32-bit and 64-bit architectures.
After you have installed R 2.13.2 as described in Install R on Windows, follow these steps to install the two sets of R packages for Oracle R Enterprise Windows client:
-
As described in Download Oracle R Enterprise Software, download these two zip archives:
-
ore-supporting-windows-1.2.zip, the supporting R packages -
ore-client-windows-1.2.zip, the Oracle R Enterprise packages.
-
-
Unzip
ore-supporting-windows-1.2.zipto your local system. This creates a top levelore-supporting-windows-1.2directory whose subdirectory structure mimics a CRAN-like repository. -
Unzip
ore-client-windows-1.2.zipto your local system. This creates a top levelore-windows-1.2directory whose subdirectory structure mimics a CRAN-like repository. -
Start either 32-bit or 64-bit R 2.13.2 from the All Programs group of the Windows Start menu. (Since the R Windows binary packages contain bundles for both 32-bit and 64-bit architectures, either architecture of R 2.13.2 can be used during the installation.)
-
You can install both sets of R packages (CRAN and ORE) from either the R Console or from the R GUI.
-
To install both sets of packages from the R Console, type
install.packages(c("ROracle", "png"),
                 repos = "file:///<DEP_PATH>/ore-supporting-windows-1.2",
                 type = "win.binary")
install.packages("ORE", repos = "file:///<ORE_PATH>/ore-client-windows-1.2",
                 type = "win.binary")
where <DEP_PATH> and <ORE_PATH> are the unzip directory locations of
ore-supporting-windows-1.2.zipandore-windows-1.2.zip filesrespectively. Theinstall.packagesfunction calls produce the message "successfully unpacked and MD5 sums checked" for each installed package. -
To install both sets of packages from the R GUI, follow these steps:
-
From the main menu, select Packages then Install package(s) from local zip files
-
Navigate to
<DEP_PATH>\ore-supporting-windows-1.2\bin\windows\contrib\2.13
where <DEP_PATH> is the unzip directory you used for the
ore-supporting-windows-1.2.zipfile. -
Select
DBI_0.2-5.zip,ROracle_1.2.zip, andpng_0.1-4.zip. -
Click Open. Each package will produce the message "successfully unpacked and MD5 sums checked" message in the R Console.
-
From the main menu, select Packages then Install package(s) from local zip files.
-
Navigate to
<ORE_PATH>\ore-client-windows-1.2\bin\windows\contrib\2.13
where <ORE_PATH> is the unzip directory you used for the
ore-windows-1.2.zipfile. -
Select
OREbase_1.2.zip,OREgraphcs_1.2.zip,OREeda_1.2.zip,OREpredict_1.2.zip,OREstats_1.2.zip,ORExml_1.2.zip, andORE_1.2.zip. -
Click Open. Each package will produce the message "successfully unpacked and MD5 sums checked" message in the R Console.
-
-
After the installation completes, install the server; then you can Start the Oracle R Enterprise Client on Microsoft Windows.
Install Client on Linux
The Oracle R Enterprise client is supported on Oracle Linux or Red Hat Linux. The client requires R-2.13.2.
To install the client you must install two sets of packages:
-
The supporting R packages
DBI,ROracle, andpng: -
The suite of Oracle R Enterprise packages:
OREbase,OREeda,OREgraphics,OREpredict,OREstats,ORExml, andORE
After you have installed R-2.13.2 on Linux as described in Install Oracle R Distribution on Linux, follow these steps to install the two sets of R packages for the Oracle R Enterprise Linux 64-bit client:
-
Download Oracle Instant Client Basic Package for 64-bit from Linux from Instant Client Downloads for Linux x86-64 (
http://www.oracle.com/technetwork/topics/linuxx86-64soft-092277.html).Oracle Instant Client includes all files required to run OCI, OCCI, and JDBC-OCI applications. The ROracle R package is an OCI application.
Either download the zip file
instantclient-basic-linux.x64-11.2.0.3.0.zipor install fromoracle-instantclient11.2-basic-11.2.0.3.0-1.x86_64.rpm.If you install using the rpm, you can use this command:
rpm -ivh <rpm_file>
If you are not sure if some version of the software s already installed, use this command:
rpm -Uvh <rpm_file>
-
Add the path where you unzipped or installed Oracle Instant Client libraries to your LD_LIBRARY_PATH.
-
Download the supporting R packages
ore-supporting-linux-x86-64-1.2.zipfromhttp://www.oracle.com/technetwork/database/options/advanced-analytics/r-enterprise/ore-downloads-1502823.html. -
Unzip
ore-supporting-linux-x86-64-1.2.zipto your local system. This creates the directoryore-supporting-linux-x86-64-1.2containing these files:DBI_0.2-5_R_x86_64-unknown-linux-gnu.tar.gz ROracle_1.2-1_R_x86_64-unknown-linux-gnu.tar.gz png_0.1-4_R_x86_64-unknown-linux-gnu.tar.gz
-
Download Oracle R Enterprise client packages
ore-client-linux-x86-64-1.2.zipfromhttp://www.oracle.com/technetwork/database/options/advanced-analytics/r-enterprise/ore-downloads-1502823.html. -
Unzip
ore-client-linux-x86-64-1.2.zipto your local system. This creates the directoryore-client-linux-x86-64-1.2containing these six files:ORE_1.2_R_x86_64-unknown-linux-gnu.tar.gz OREbase_1.2_R_x86_64-unknown-linux-gnu.tar.gz OREeda_1.2_R_x86_64-unknown-linux-gnu.tar.gz OREgraphics_1.2_R_x86_64-unknown-linux-gnu.tar.gz OREpredict_1.2_R_x86_64-unknown-linux-gnu.tar.gz OREstats_1.2_R_x86_64-unknown-linux-gnu.tar.gz ORExml_1.2_R_x86_64-unknown-linux-gnu.tar.gz
-
Go to the directory
ore-supporting-linux-x86-64-1.2. Type the following commands to install the supporting R packages:R CMD INSTALL DBI_0.2-5_R_x86_64-unknown-linux-gnu.tar.gz R CMD INSTALL ROracle_1.2-1_R_x86_64-unknown-linux-gnu.tar.gz R CMD INSTALL png_0.1-4_R_x86_64-unknown-linux-gnu.tar.gz
These commands generate the following messages to confirm successful installation of the packages:
* installing to library '<Your $R_HOME directory> /library'
* installing *binary* package 'DBI' ...
* DONE (DBI)
* installing to library '<Your $R_HOME directory> /library'
* installing *binary* package 'ROracle' ...
* DONE (ROracle)
* installing to library '<Your $R_HOME directory> /library'
* installing *binary* package 'png' ...
* DONE (png)
-
Go to the directory
ore-linux-x86-64-1.2. Type the following commands to install the ORE packages:R CMD INSTALL ORE_1.2_R_x86_64-unknown-linux-gnu.tar.gz R CMD INSTALL OREbase_1.2_R_x86_64-unknown-linux-gnu.tar.gz R CMD INSTALL OREeda_1.2_R_x86_64-unknown-linux-gnu.tar.gz R CMD INSTALL OREgraphics_1.2_R_x86_64-unknown-linux-gnu.tar.gz R CMD INSTALL OREpredict_1.2_R_x86_64-unknown-linux-gnu.tar.gz R CMD INSTALL OREstats_1.2_R_x86_64-unknown-linux-gnu.tar.gz R CMD INSTALL ORExml_1.2_R_x86_64-unknown-linux-gnu.tar.gz
Each command generates messages like the following to confirm successful installation of the packages:
* installing to library '<Your $R_HOME directory> /library'
* installing *binary* package '<>' ...
* DONE (<>)
After the installation completes. Install the server; then you can Start the Oracle R Enterprise Client on Linux, Solaris, or AIX.
Install Client on Solaris
Oracle R Enterprise client is supported on Oracle Solaris (both SPARC and x86-64). The client requires R-2.13.2.
To install the client you must install two sets of packages:
-
The supporting R packages
DBI,ROracle, andpng: -
The suite of Oracle R Enterprise packages:
OREbase,OREeda,OREgraphics,OREpredict,OREstats,ORExml, andORE
After you have installed R-2.13.2 on Solaris as described in Install R on Solaris, follow these steps to install the two sets of R packages for Oracle R Enterprise Solaris 64-bit client:
-
Download Oracle Instant Client Basic Package for 64-bit for Solaris from Instant Client Downloads for Solaris SPARC-64 at
http://www.oracle.com/technetwork/topics/sol64soft-085649.htmlor Instant Client Package - Basic for Solaris Operating System (SPARC 64-bit) at
http://www.oracle.com/technetwork/topics/sol64soft-085649.html.Oracle Instant Client includes all files required to run OCI, OCCI, and JDBC-OCI applications. The ROracle R package is an OCI application.
Download the appropriate Instant Client zip file.
-
Add the path where you unzipped or installed Oracle Instant Client libraries to your LD_LIBRARY_PATH.
-
Download the supporting R packages
ore-supporting-solaris-sparc-64-1.2.zipfor SPARC orore-supporting-solaris-x86-64-1.2.zipfromhttp://www.oracle.com/technetwork/database/options/advanced-analytics/r-enterprise/ore-downloads-1502823.html. -
Unzip
ore-supporting-solaris-sparc-64-1.2.ziporore-supporting-solaris-x86-64-1.2.zipto your local system. This creates the directoryore-supporting-solaris-sparc-64-1containing these files for SPARC:-
DBI_0.2-5_R_sparc-sun-solaris2.10.tar.gz -
ROracle_1.1-3_R_sparc-sun-solaris2.10.tar.gz -
png_0.1-4_R_sparc-sun-solaris2.10.tar.gz
or the directory
ore-supporting-solaris-x86-64-1.2containing these files for x386:-
DBI_0.2-5_R_x86_64-pc-solaris2.10.tar.gz -
png_0.1-4_R_x86_64-pc-solaris2.10.tar.gz -
ROracle_1.1-3_R_x86_64-pc-solaris2.10.tar.gz
-
-
Download Oracle R Enterprise client packages
ore-client-solaris-sparc-64-1.2.zipor ore-client-solaris-x86-64-1.2.zip fromhttp://www.oracle.com/technetwork/database/options/advanced-analytics/r-enterprise/ore-downloads-1502823.html. -
Unzip
ore-client-solaris-sparc-64-1.2.ziporore-client-solaris-x86-64-1.2.zipto your local system. This creates the directoryore-client-solaris-x86-64-1.2containing this set of files for x86-64:-
ORE_1.2_R_sparc-sun-solaris2.10.tar.gz -
OREbase_1.2_R_sparc-sun-solaris2.10.tar.gz -
OREeda_1.2_R_sparc-sun-solaris2.10.tar.gz -
OREgraphics_1.2_R_sparc-sun-solaris2.10.tar.gz -
OREstats_1.2_R_sparc-sun-solaris2.10.tar.gz -
ORExml_1.2_R_sparc-sun-solaris2.10.tar.gz -
OREpredict_1.2_R_sparc-sun-solaris2.10.tar.gz
or the directory
ore-client-solaris-sparc-64-1.2containing these files for SPARC:-
ORE_1.2_R_x86_64-pc-solaris2.10.tar.gz -
OREbase_1.2_R_x86_64-pc-solaris2.10.tar.gz -
OREeda_1.2_R_x86_64-pc-solaris2.10.tar.gz -
OREgraphics_1.2_R_x86_64-pc-solaris2.10.tar.gz -
OREstats_1.2_R_x86_64-pc-solaris2.10.tar.gz -
ORExml_1.2_R_x86_64-pc-solaris2.10.tar.gz -
OREpredict_1.2_R_x86_64-pc-solaris2.10.tar.gz
-
-
Go to the directory
ore-supporting-solaris-sparc-64-1.2orore-supporting-solaris-x86-64-1.2. Type the following commands to install the supporting R package on SPARC:R CMD INSTALL DBI_0.2-5_R_sparc-sun-solaris2.10.tar.gz R CMD INSTALL ROracle_1.1-3_R_sparc-sun-solaris2.10.tar.gz R CMD INSTALL png_0.1-4_R_sparc-sun-solaris2.10.tar.gz
or these commands to install the supporting package for x386:
R CMD INSTALL DBI_0.2-5_R_x86_64-pc-solaris2.10.tar.gz
R CMD INSTALL ROracle_1.1-3_R_x86_64-pc-solaris2.10.tar.gz
R CMD INSTALL png_0.1-4_R_x86_64-pc-solaris2.10.tar.gz
These commands generate the following messages to confirm successful installation of the packages:
* installing to library '<Your $R_HOME directory> /library'
* installing *binary* package 'DBI' ...
* DONE (DBI)
* installing to library '<Your $R_HOME directory> /library'
* installing *binary* package 'ROracle' ...
* DONE (ROracle)
* installing to library '<Your $R_HOME directory> /library'
* installing *binary* package 'png' ...
* DONE (png)
-
Go to the directory
ore-solaris-sparc-64-1.2orore-solaris-x86-64-1.2. Type the following commands to install the ORE packages on SPARC:R CMD INSTALL ORE_1.2_R_sparc-sun-solaris2.10.tar.gz R CMD INSTALL OREbase_1.2_R_sparc-sun-solaris2.10.tar.gz R CMD INSTALL OREeda_1.2_R_sparc-sun-solaris2.10.tar.gz R CMD INSTALL OREgraphics_1.2_R_sparc-sun-solaris2.10.tar.gz R CMD INSTALL OREstats_1.2_R_sparc-sun-solaris2.10.tar.gz R CMD INSTALL ORExml_1.2_R_sparc-sun-solaris2.10.tar.gz R CMD INSTALL OREpredict_1.2_R_sparc-sun-solaris2.10.tar.gz
or these commands to install on x386-64
R CMD INSTALL ORE_1.2_R_x86_64-pc-solaris2.10.tar.gz
R CMD INSTALL OREbase_1.2_R_x86_64-pc-solaris2.10.tar.gz
R CMD INSTALL OREeda_1.2_R_x86_64-pc-solaris2.10.tar.gz
R CMD INSTALL OREgraphics_1.2_R_x86_64-pc-solaris2.10.tar.gz
R CMD INSTALL OREstats_1.2_R_x86_64-pc-solaris2.10.tar.gz
R CMD INSTALL ORExml_1.2_R_x86_64-pc-solaris2.10.tar.gz
R CMD INSTALL OREpredict_1.2_R_x86_64-pc-solaris2.10.tar.gz
Each command generates messages like the following ones to confirm successful installation of the packages:
* installing to library '<Your $R_HOME directory> /library'
* installing *binary* package '<>' ...
* DONE (<>)
After the client installation completes, install the server; then you can Start the Oracle R Enterprise Client on Linux, Solaris, or AIX.
Install Client on AIX
Oracle R Enterprise client is supported on IBM AIX 5.3 or higher on POWER Systems (64-Bit). The client requires R-2.13.2.
To install the client you must install two sets of packages:
-
The supporting R packages
DBI,ROracle, andpng: -
The suite of Oracle R Enterprise packages:
OREbase,OREeda,OREgraphics,OREpredict,OREstats,ORExml, andORE
After you have installed R-2.13.2 on AIX as described in Install Client on AIX, follow these steps to install the two sets of R packages for Oracle R Enterprise AIX 64-bit client:
-
Download Oracle Instant Client Basic Package for 64-bit AIX from Instant Client Downloads for AIX
http://www.oracle.com/technetwork/topics/aix5lsoft-098883.htmlOracle Instant Client includes all files required to run OCI, OCCI, and JDBC-OCI applications. The ROracle R package is an OCI application.
-
Add the path where you unzipped or installed Oracle Instant Client libraries to your LIBPATH.
-
Download the supporting R packages
ore-supporting-aix-ppc64-1.2.zipfromhttp://www.oracle.com/technetwork/database/options/advanced-analytics/r-enterprise/ore-downloads-1502823.html. -
Unzip
ore-supporting-aix-ppc64-1.2.zipto your local system. This creates the directorysupportingcontaining these files:-
DBI_0.2-5_R_powerpc-ibm-aix6.1.0.0.tar.gz -
ROracle_1.1-3_R_powerpc-ibm-aix6.1.0.0.tar.gz -
png_0.1-4_R_powerpc-ibm-aix6.1.0.0.tar.gz
-
-
Download Oracle R Enterprise client packages
ore-client-aix-ppc64-1.2.zipfromhttp://www.oracle.com/technetwork/database/options/advanced-analytics/r-enterprise/ore-downloads-1502823.html. -
Unzip
ore-client-aix-ppc64-1.2.zipto your local system. This creates the directoryclientcontaining these files:-
ORE_1.2_R_ppc64-unknown-aix.tar.gz -
OREbase_1.2_R_ppc64-unknown-aix.tar.gz -
OREeda_1.2_R_ppc64-unknown-aix.tar.gz -
OREgraphics_1.2_R_ppc64-unknown-aix.tar.gz -
OREstats_1.2_R_ppc64-unknown-aix.tar.gz -
ORExml_1.2_R_ppc64-unknown-aix.tar.gz -
OREpredict_1.2_R_ppc64-unknown-aix.tar.gz
-
-
Go to the directory
supporting. Type the following commands to install the supporting R packages:R CMD INSTALL DBI_0.2-5_R_powerpc-ibm-aix6.1.0.0.tar.gz R CMD INSTALL ROracle_1.1-3_R_powerpc-ibm-aix6.1.0.0.tar.gz R CMD INSTALL png_0.1-4_R_powerpc-ibm-aix6.1.0.0.tar.gz
These commands generate the following messages to confirm successful installation of the packages:
* installing to library '<Your $R_HOME directory> /library'
* installing *binary* package 'DBI' ...
* DONE (DBI)
* installing to library '<Your $R_HOME directory> /library'
* installing *binary* package 'ROracle' ...
* DONE (ROracle)
* installing to library '<Your $R_HOME directory> /library'
* installing *binary* package 'png' ...
* DONE (png)
-
Go to the directory
client. Type the following commands to install the ORE packages:R CMD INSTALL ORE_1.2_R_ppc64-unknown-aix.tar.gz R CMD INSTALL OREbase_1.2_R_ppc64-unknown-aix.tar.gz R CMD INSTALL OREeda_1.2_R_ppc64-unknown-aix.tar.gz R CMD INSTALL OREgraphics_1.2_R_ppc64-unknown-aix.tar.gz R CMD INSTALL OREstats_1.2_R_ppc64-unknown-aix.tar.gz R CMD INSTALL ORExml_1.2_R_ppc64-unknown-aix.tar.gz R CMD INSTALL OREpredict_1.2_R_ppc64-unknown-aix.tar.gz
Each command generates messages like the following ones to confirm successful installation of the packages:
* installing to library '<Your $R_HOME directory> /library'
* installing *binary* package '<>' ...
* DONE (<>)
After the client installation completes, install the server; then you can Start the Oracle R Enterprise Client on Linux, Solaris, or AIX.
Install the Server
This section describes how to install the Oracle R Enterprise server on Windows, Linux, Solaris, and AIX.
Install the server as follows:
-
Make sure that the Prerequisites for Windows, Linux, Solaris, or AIX are satisfied.
-
You must install the client before you can run Oracle R Enterprise. You can Install Client on Microsoft Windows, Install Client on Linux, Install Client on Solaris, or Install Client on AIX.
-
Make sure that Oracle Database is installed on the system where you plan to install the server. Make sure that any required patches are installed properly. Oracle R Enterprise server is installed in an Oracle Database 12c Release 1 (12.1), so an appropriate version of the database must be installed before you install Oracle R Enterprise server.
-
Make sure that all of the requirements in Before You Install the Server are satisfied.
-
Follow the directions in Install Server on Microsoft Windows, Install Server on Linux, Install Server on Solaris, or Install Server on AIX to install the server.
The install script creates Administrative Roles that you may need to grant to users who perform certain tasks.
After the install completes, you can Create Users.
After the server installation successfully completes, you can Start the Oracle R Enterprise Client on Microsoft Windows or Start the Oracle R Enterprise Client on Linux, Solaris, or AIX. Once the client has started, you can start Using Oracle R Enterprise.
Before You Install the Server
The install scripts for the Oracle R Enterprise server require that certain environment variables are properly set.
Important: Before you start installation, make sure that:
-
You have DBA privileges, that is, you can run as
oracle:-
On Linux, you must be a member of the DBA group; the user
oraclesatisfies this requirement. Note thatrootis not usually a member of the DBA group. -
On Windows, you must be a member of the ORA_DBA group; see Notes for Microsoft Windows Installation for more information.
-
On Solaris, you must be a member of the DBA group
-
On AIX, you must be a member of the DBA group
In any case, make sure that you are logged in to an account with DBA privileges before you run the install script.
-
-
You have write privileges at the operating system level to the file
$ORACLE_HOME/lib; the useroraclesatisfies this requirement -
You can run R. This usually means that the R executable in your PATH environment variable.
In summary, for all platforms, you can use the account that you used to install the database to install the server. Check that you can run R from this account.
The installation scripts work as follows:
-
Before the Oracle R Enterprise server install starts, it checks for the presence of an R installation in the form of environment variable R_HOME. Make sure that R_HOME exists and is set properly.
-
Once the script verifies that R is known to be installed and its location known via PATH, the install checks for the presence of these libraries in
$R_HOME/lib/. In particular, the script checks for-
$R_HOME/lib/libR.so -
$R_HOME/lib/libRblas.so -
$R_HOME/lib/libRlapack.so
-
-
Next the script checks the location of the database installation by checking for the presence of environment variable ORACLE_HOME and ORACLE_SID.
If ORACLE_HOME is set, the install expects that the
$ORACLE_HOME/libdirectory is present.Before you start the script check that ORACLE_HOME and ORACLE_SID are present and properly set.
-
Next the script checks the Oracle database instance information. The check includes looking for environment variable ORACLE_SID and then connecting to the instance by starting
sqlplus as sysdba
Logging into the database as
sysdbais critical for the install script to proceed.If
sqlplusfails to connect to the database instance, the install process aborts.Before you start the installation script, check that you can connect to the database using this
sqlpluscommand. -
If Oracle R Enterprise has been installed on the database, that is if you installed release 1.0, then the installer expects to find a user name called RQSYS in
dba_userstable and the Oracle R Enterprise version number details in SYS.RQ_CONFIG. The installer uses this information subsequently to install the correct SQL packages. -
The script prompts you to optionally enter the names of permanent and temporary table spaces for the RQSYS schema; the default schemas are SYSAUX and TEMP.
At this point, the install script has determined it has found the prerequisites satisfactory and proceeds to do the actual installation.
-
The install script now attempts to copy libraries to
$ORACLE_HOME/lib.If
$ORACLE_HOME/libis not writable then the installer errors out. -
The install script now installs the RQSYS schema. Installing the schema requires logging into the database as SYSDBA.
-
Finally, the ORE packages are installed under the R installation.
You can now create Oracle R Enterprise users as described in Create Users.
Note that the installation creates Administrative Roles that are required for users to performs certain tasks. You may have to grant these roles to users.
Notes for Microsoft Windows Installation
Before you install the Server on Windows, perform these checks:
Check Membership in ORA_DBA
If you installed Oracle on Windows, you are automatically added to ORA_DBA. Checking that you are a member of the ORA_DBA group depends on the release of Windows:
-
For Microsoft Windows XP, go to Start then All Programs then to Administrative Tools. Select Computer Management, then System Tools, then Local Users and Groups, then Groups. Double-click ora_dba. The list of users in ora_dba is displayed. Use one of these accounts to install the server.
-
For Microsoft Windows Vista, see
http://windows.microsoft.com/en-US/windows-vista/Add-a-user-account-to-a-group. -
For Microsoft Windows 7, see
http://windows.microsoft.com/en-US/windows7/Add-a-user-account-to-a-group.
For information about ORA_DBA, see the Oracle Database 12c Release 1 (12.1) Platform Guide for Microsoft Windows.
Create or Modify PATH Environment Variable
The install script looks at the PATH system variable to find the database executable. On Windows, you may not have a PATH system variable defined.
If the PATH variable does not exist, create it and set it to $ORACLE_HOME\bin, the directory where the executable for the database resides.
Windows does not require the LD_LIBRARY_PATH environment variable that is required by the other platforms.
You view, edit and create s environment variable from the Advanced tab of System. The steps to navigate to this tab depends on the version of Windows installed on your system:
-
For Microsoft Windows XP, go to Start then Control Panel. Double-click System. On the
Advancedtab click Environment Variables. -
For Microsoft Windows Vista, click Start, type Accounts in the
Startsearch box, and then clickUser Accountsunder Programs. In the User Accounts dialog box, click Change my environment variables under Tasks. Make changes and then click OK when done. -
For Microsoft Windows 7, go to Start then Control Panel. Double click System and Security, then System, and then Advanced system settings.
It may be necessary to log in as an administrator to change environment variables.
Check R Installation
You must install R before you install the server. Before you start the server installation, check that you can run R If you installed R in the default location, the GUI executable resides in C:\Program Files\R\R-2.13.2\bin\i386.
Install Server on Microsoft Windows
These directions describe how to install Oracle R Enterprise on Microsoft Windows XP or later for the 32-bit or 64-bit architecture.
Review Before You Install the Server before you run the installation script. Make sure that all environment variables are properly set and that all required directories are present.
Follow these steps to install the server:
-
Before you start the installation, make sure that these environment variables exist and are defined properly:
-
Add $ORACLE_HOME\bin to PATH
-
Define the variable ORACLE_SID; it contains the SID for the database where you install ORE.
For information about setting environment variables in Windows, see Notes for Microsoft Windows Installation.
-
-
You must have DBA privileges that is, you can run as
oracle. The install scripts run SQL*Plus/ as sysdbaand write to ORACLE_HOME. -
For Oracle Database 12c Release 1 (12.1), Oracle Universal Installer copies the installation files to
$ORACLE_HOME/R/ORE_1_2.To install the server, open a command window and navigate to
$ORACLE_HOME/R/ORE_1_2, and executeinstall.bat. -
Alternatively, you can download the software, as described in Download Oracle R Enterprise Software. If you download the software, follow these steps:
-
Unzip the download.
-
Open a command window and navigate to the directory where you unzipped the download.
-
Execute
install.bat.
-
-
Note:
Ifinstall.batfails, go to Before You Install the Server and check that all requirements are satisfied.For example, if the environment variables ORACLE_HOME and ORACLE_SID are not set,
install.batwill fail. -
After installation completes, create at least one user, as described in Create Users. It may be necessary to grant Administrative Roles to users who perform certain tasks.
-
Install the R supporting packages
ore-supporting-windows-1.2.zipif they are not installed already. For directions, see Install Client on Microsoft Windows. -
You may wish to use Oracle Wallet, especially if you plan to run scripts in lights-out mode. For information, see Configure Oracle Wallet (Optional).
Finally Start the Oracle R Enterprise Client on Microsoft Windows or Start the Oracle R Enterprise Client on Linux, Solaris, or AIX.
-
After you have installed both client and server, Validate Oracle R Enterprise Installation.
Install Server on Linux
These directions describe how to install Oracle R Enterprise on Oracle Linux, Red Hat Linux, or Oracle Exadata Database Machine on the Linux x86-64 platform.
Review Before You Install the Server before you run the installation script. Make sure that all environment variables are properly set and that all required directories are present.
After the client installation completes, follow these steps to install the server:
-
Before you start the installation, make sure that these environment variables exist and are defined properly:
-
Set the environment variable R_HOME. In the bash shell use
export R_HOME=/usr/lib64/R
-
Add $R_HOME to LD_LIBRARY_PATH. In the bash shell use
export LD_LIBRARY_PATH=$RHOME/lib:$LD_LIBRARY_PATH
-
Add $R_HOME/bin to PATH. In the bash shell, use
export PATH=/usr/lib64/R:$PATH
-
Add $ORACLE_HOME/lib to LD_LIBRARY_PATH
-
Add $ORACLE_HOME/bin to PATH
-
Define variable $ORACLE_SID; it contains the SID for the database where you install ORE.
-
-
You must have DBA privileges that is, you can run as
oracle. The install scripts run SQL*Plus/ as sysdbaand write to ORACLE_HOME. -
For Oracle Database 12c Release 1 (12.1), Oracle Universal Installer copies the installation files to
$ORACLE_HOME/R/ORE_1_2.To install the server, navigate to
$ORACLE_HOME/R/ORE_1_2, and executeinstall.sh. -
Alternatively, you can download the software, as described in Download Oracle R Enterprise Software. If you download the software, follow these steps:
-
Unzip the download.
-
Open a command window and navigate to the directory where you unzipped the download.
-
Execute
install.sh.
-
-
This script copies several libraries to
$ORACLE_HOME/lib.The script executes
rqinst.sqlwith SYSAUX and TEMP as the default and temporary tablespaces.The script creates all SQL objects required by Oracle R Enterprise in the RQSYS user schema. The RQSYS schema is created as a locked account with expired password and no connect privileges.
-
After installation completes, create at least one user as described in Create Users. It may be necessary to grant Administrative Roles to users who perform certain tasks.
-
Install the R supporting packages
ore-supporting-linux-x86-64-1.2.zip, if they are not installed already. For directions, see Install Client on Linux. -
You may wish to use Oracle Wallet, especially if you plan to run scripts in light-out mode. For information, see Configure Oracle Wallet (Optional)
Finally Start the Oracle R Enterprise Client on Microsoft Windows or Start the Oracle R Enterprise Client on Linux, Solaris, or AIX.
-
After you have installed both client and server, Validate Oracle R Enterprise Installation.
Install Server on Solaris
These directions describe how to install Oracle R Enterprise on Oracle Solaris on SPARC and x86-64 platforms.
Review Before You Install the Server before you run the installation script. Make sure that all environment variables are properly set and that all required directories are present.
After the client installation completes, follow these steps to install the server:
-
Before you start the installation, make sure that these environment variables exist and are defined properly:
-
Add $R_HOME to LD_LIBRARY_PATH
-
Add $R_HOME/bin to PATH
-
Add $ORACLE_HOME/lib to LD_LIBRARY_PATH
-
Add $ORACLE_HOME/bin to PATH
-
Define variable $ORACLE_SID; it contains the SID for the database where you install ORE.
-
-
You must have DBA privileges that is, you can run as
oracle. The install scripts run SQL*Plus/ as sysdbaand write to ORACLE_HOME. -
For Oracle Database 12c Release 1 (12.1), Oracle Universal Installer copies the installation files to
$ORACLE_HOME/R/ORE_1_2.To install the server, navigate to
$ORACLE_HOME/R/ORE_1_2, and executeinstall.sh. -
Alternatively, you can download the software, as described in Download Oracle R Enterprise Software. If you download the software, follow these steps:
-
Unzip the download.
-
Open a command window and navigate to the directory where you unzipped the download.
-
Execute
install.sh.
-
-
install.shcopies several libraries to $ORACLE_HOME/lib.The script executes
rqinst.sqlwith SYSAUX and TEMP as the default and temporary tablespaces.The script creates all SQL objects required by Oracle R Enterprise in the RQSYS user schema. The RQSYS schema is created as a locked account with expired password and no connect privileges.
-
After installation completes, create at least one user, as described in Create Users. It may be necessary to grant Administrative Roles to users who perform certain tasks.
-
Install the R supporting packages
ore-supporting-solaris-sparc-64-1.2.zip(orore-supporting-solaris-x86-64-1.2.zip), if they are not installed already. For directions, see Install Client on Solaris. -
You may wish to use Oracle Wallet, especially if you plan to run scripts in light-out mode. For information, see Configure Oracle Wallet (Optional).
Finally Start the Oracle R Enterprise Client on Microsoft Windows or Start the Oracle R Enterprise Client on Linux, Solaris, or AIX.
-
After you have installed both client and server, Validate Oracle R Enterprise Installation.
Install Server on AIX
These directions describe how to install Oracle R Enterprise on IBM AIX on POWER Systems (64-Bit).
After the client installation completes, follow these steps to install the server:
Review Before You Install the Server before you run the installation script. Make sure that all environment variables are properly set and that all required directories are present.
-
Before you start the installation, make sure that these environment variables exist and are defined properly:
-
Add $R_HOME to LD_LIBPATH
-
Add $R_HOME/bin to PATH
-
Add $ORACLE_HOME/lib to LIBPATH
-
Add $ORACLE_HOME/bin to PATH
-
Define variable $ORACLE_SID; it contains the SID for the database where you install ORE.
-
-
You must have DBA privileges that is, you can run as
oracle. The install scripts run SQL*Plus/ as sysdbaand write to ORACLE_HOME. -
For Oracle Database 12c Release 1 (12.1), Oracle Universal Installer copies the installation files to
$ORACLE_HOME/R/ORE_1_2.To install the server, navigate to
$ORACLE_HOME/R/ORE_1_2, and executeinstall.sh. -
Alternatively, you can download the software, as described in Download Oracle R Enterprise Software. If you download the software, follow these steps:
-
Unzip the download.
-
Open a command window and navigate to the directory where you unzipped the download.
-
Execute
install.sh.
-
-
i
nstall.shcopies several libraries to $ORACLE_HOME/lib.The script executes
rqinst.sqlwith SYSAUX and TEMP as the default and temporary tablespaces.The script creates all SQL objects required by Oracle R Enterprise in the RQSYS user schema. The RQSYS schema is created as a locked account with expired password and no connect privileges.
-
After installation completes, create at least one user, as described in Create Users. It may be necessary to grant Administrative Roles to users who perform certain tasks.
-
Install the R supporting packages
ore-supporting-aix-ppc64-1.2.zip, if they are not installed already. For directions, see Install Client on AIX. -
You may wish to use Oracle Wallet, especially if you plan to run scripts in light-out mode. For information, see Configure Oracle Wallet (Optional).
Finally Start the Oracle R Enterprise Client on Microsoft Windows or Start the Oracle R Enterprise Client on Linux, Solaris, or AIX.
-
After you have installed both client and server, Validate Oracle R Enterprise Installation.
Administrative Roles
The installation creates an administrative role RQADMIN and a user role RQROLE. The roles are used as follows:
Create Users
For an example of how to create an Oracle R Enterprise user, see.
For each Oracle R Enterprise user, these steps are required to fully enable the user on the database as demonstrated in the demo_user.sh script.
Start SQL*Plus as sysdba; then follow these steps:
-
Create a new user with desired quota as described in
demo_user.shordemo_user.bat.If you have already created a user, go to the next step. -
Suppose that the name of the user is
new_user. Execute this command:grant create session, rqrole, rqadmin to new_user
This command grants both Administrative Roles to
new_user. -
Execute this command:
grant execute on rqsys.rqGroupEvalImpl to new_user
-
Create all the synonyms for
new_userlisted inrquser.sql. Required commands are inrquser.sql.(A synonym is an alias for a schema object. You can use synonyms to provide data independence and location transparency.)
-
Repeat these steps for each Oracle R Enterprise user.
Configure Oracle Wallet (Optional)
Oracle Wallet provides secure storage of user passwords and client certificates. An Oracle Wallet provides a secure way for embedded R scripts to avoid storing passwords in the script.
Follow these steps to configure Oracle Wallet with Oracle R Enterprise:
-
Configure Oracle Wallet and store the username and password. The details are in the wallet documentation in the Oracle Database Security Guide.
-
Add the connection string used to create the wallet entry (for example, "mydb12c_test") to map to the DB instance connection string in
tnsnames.ora(Change the host name to be your database machine name and SID to be the SID of your database.):mydb12c_test = (DESCRIPTION = (ADDRESS = (PROTOCOL = TCP) (HOST = <host_name>) (PORT = 1521) ) (CONNECT_DATA = (sid=<SID>)) )After you complete the steps, you can just use the connect_string to connect to the database:
ore.connect(conn_string = "mydb12c_test", all = TRUE)
Start the Oracle R Enterprise Client on Microsoft Windows
After the server is installed, you can launch the client.
To launch Oracle R Enterprise client in a running session of R 2.13.2, execute the following R code from the R Console. Before you execute the code, modify the connection information (user, sid, host, password, and port) for the database where the R Sever is installed:
# Load ORE packages and dependencies
# DBI, ROracle, OREbase, MASS, OREstats,
# OREgraphics, OREeda, ORExml, ORE
library(ORE)

# Connect to Oracle RDBMS
# Change the connection information below
ore.connect(user = "<USERNAME>",
            sid = "<SID>",
            host = "<HOST>",
            password = "<PASSWORD>",
            port = PORTNUMBER
            all = TRUE)
To test that you can connect to the specified Oracle Database 12c Release 1 (12.1), type
ore.is.connected()
ore.is.connected returns TRUE if you are connected to the database, or FALSE if you are not connected.
After you set up Oracle Wallet, as described in Configure Oracle Wallet (Optional), you can connect as follows:
ore.connect(conn_string = "ore_wallet", all = TRUE)
ore_wallet is a connect string that has been registered with the Wallet.
As with all R commands, this code can be used during the initialization of an R session.
For information about the initialization sequence of R on startup, type help(Startup) in the R Console.
Specify ore.connect in an embedded R function, otherwise all embedded R scripts automatically go to the same schema.
For more information about database connectivity, see Connect to an Oracle Database.
Start the Oracle R Enterprise Client on Linux, Solaris, or AIX
After the server is installed, you can launch the client.
Before you launch Oracle R Enterprise client, add these paths to the LD_LIBRARY_PATH environment variable:
-
The path where Oracle Instant Client libraries are installed. Otherwise loading of ROracle package will fail.
-
The path for the shared libraries
libR.so,libRblas.so, andlibRlapack.sofrom the installation of R-2.13.2
Start R-2.13.2 from your favorite Linux shell. Next use ore.connect to connect to Oracle Database 12c Release 1 (12.1) where the server resides.
Launch Oracle R Enterprise client by executing, after modifying the connection information (user, sid, host, password, and port), the following R code from the R Console:
# Load ORE packages and dependencies
# DBI, ROracle, OREbase, MASS, OREstats,
# OREgraphics, OREeda, ORExml, ORE
library(ORE)

# Connect to Oracle RDBMS
# Change the connection information below
ore.connect(user = "<USERNAME>",
            sid = "<SID>",
            host = "<HOST>",
            password = "<PASSWORD>",
            port = PORTNUMBER,
            all = TRUE)
Your Oracle Database Administrator can provide you with suitable values for USERNAME, SID, HOST, PASSWORD, and PORT. These values provide connection information for the database.
ore.connect can now use Oracle Wallet.
After you set up Oracle Wallet, as described in Configure Oracle Wallet (Optional), you can connect as follows:
ore.connect(conn_string = "ore_wallet", all = TRUE)
ore_wallet is a connect string that has been registered with the Wallet.
For information on the initialization sequence of R on startup, type help(Startup) in the R Console.
For more information about database connectivity, see Connect to an Oracle Database.
Connect to an Oracle Database
Oracle R Enterprise includes the following R functions that enable transparent access to Oracle Database 12c Release 1 (12.1) tables and views:
-
ore.attach(USER, SID, host, password)establishes a database connection using the schema or user name, the database SID, machine hostname, and password, and creates an environment that maps database table names to R objects (ore.frame) from the schema referenced in the database connection.At this time, views are not mapped.
If you use the
allparameter ofore.connectwhen you attach to a database,ore.attachis executed automatically. -
ore.sync()synchronizes with your schema (account) in Oracle Database.ore.connectcan perform this command.If you use the
allparameter ofore.connectwhen you attach to a database,ore.syncis executed automatically. -
ore.ls()lists all objects in the schema you are currently connected to.
Objects created by Oracle R Enterprise are identified with the ore prefix. Pick any object returned by ore.ls() and type either class(OBJECTNAME) or class(OBJECTNAME$COLUMN_NAME).
For example,
R> class(NARROW)
[1] "ore.frame"
attr(,"package")
[1] "OREbase"
The prefix ore is applied to the class names. This indicates that the object is an Oracle R Enterprise created object that holds metadata (instead of contents) of the corresponding object in Oracle Database.
Oracle R Enterprise Samples
Oracle R Enterprise is shipped with a collection of examples that illustrate how to use Oracle R Enterprise. The examples are shipped as demos included in the ORE package. For more information about the examples, see List of Examples.
Troubleshoot the Installation
The installation script creates a log file in each folder (client, data, and server). Make sure that you look at each of the log files even if the installation reports success. Search the log file for ERROR.
If you cannot resolve the problems, request help from Oracle Support or from the Oracle R Enterprise discussion forum.
Upgrade Oracle R Enterprise
If you installed the first release of Oracle R Enterprise, you can upgrade to release 1.2 as follows:
-
To upgrade the Client on Windows, re-install the packages. See Install Client on Microsoft Windows.
-
To upgrade the Client on Linux, reinstall the packages. See Install Client on Linux.
-
To upgrade the Server, reinstall the Server. See Install the Server.
Validate Oracle R Enterprise Installation
After you complete the installation, follow these steps to validate it:
-
Start R on a client. Load the Oracle R Enterprise Packages:
R> library(ORE)
-
Connect to Oracle Database on the server. The exact command depends the details for the database to which you connect:
R> ore.connect(user = "rquser", sid = "orcl", host = "localhost",password = "rquser", port = 1521, all = TRUE)
In this command provide the values for
user,sid,host,password, andportthat are correct for your database. If you did not install the database, you may have to ask the DBA for these values. -
Run several Oracle R Enterprise demos. This command provides a list of available demos:
R> demo(package = "ORE")
These commands illustrate how to run specific demos:
# Test the transparency layer
R> demo("aggregate", package = "ORE")

# Test embedded R:
R> demo("row_apply", package = "ORE")
Uninstall Oracle R Enterprise
Follow these steps to uninstall Oracle R Enterprise client:
-
To remove the Oracle R Enterprise packages, start R and type these commands:
remove.packages("ORE") remove.packages("ORExml") remove.packages("OREeda") remove.packages("OREgraphics") remove.packages("OREstats") remove.packages("OREbase") remove.packages("ROracle") remove.packages("DBI") -
Unset the environment variable R_PROFILE_USER.
To uninstall Oracle R Enterprise server, execute
-
uninstall.sh(Linux, Solaris, or AIX) -
uninstall.bat(Windows)
Either script removes libraries installed in $ORACLE_HOME/lib and removes all installed SQL objects.