4 About Uploading Data
This section describes how to import data into an Oracle Application Express application using an existing application Data Loading Wizard.
Tip:
To use the functionality described in this section, your application must be built with Data Upload capability. To learn more, see "Creating Applications with Data Loading Capability" in Oracle Application Express Application Builder User's Guide.4.1 About Using the Data Loading Wizard
Applications with data loading capability enable end users to dynamically import data into a table within any schema to which the user has access. End users run a Data Load Wizard that uploads data from a file or copies and pastes data entered by the end user directly into the wizard.
The Data Loading wizard for your application may have been built to include the ability to apply table lookup and transformation rules during the data upload process. Before the data is actually imported into the database, you are given the opportunity to review the data after all look up and transformation rules have been applied.
-
Table Lookups - These rules automatically map data in the import file or copy and paste field to data that is found in another table. For example, if the import file contains a department name for the
DEPTNOcolumn but the upload table requires a number for that column, use a table lookup rule to find the corresponding department number for that department name in another table. -
Data transformation rules - These rules automatically perform formatting transformations such as changing import data to uppercase, lowercase, and so on. For example, if the import file includes column data with both upper and lowercase and the destination table requires all uppercase, data transformation rules can automatically insert only uppercase into that column during data upload
4.2 Importing Data from a File into Your Application
To upload data to your application, the application must have been built with Data Upload capability and the file must be formatted properly.
To illustrate how you can use the Data Load wizard to import data from a text file, the following section demonstrates the upload process and includes examples from the sample packaged application, Sample Database Application.
See Also:
"Utilizing Packaged Applications" and "About Sample Database Application" in Oracle Application Express Application Builder User's GuideTo import data from a file into the sample packaged application, Sample Database Application:
-
Log into the sample packaged application, Sample Database Application.
-
On the Customers page, click Upload Data to launch the Data Load wizard.
The Data Load wizard appears.
-
For Data Source Load:
-
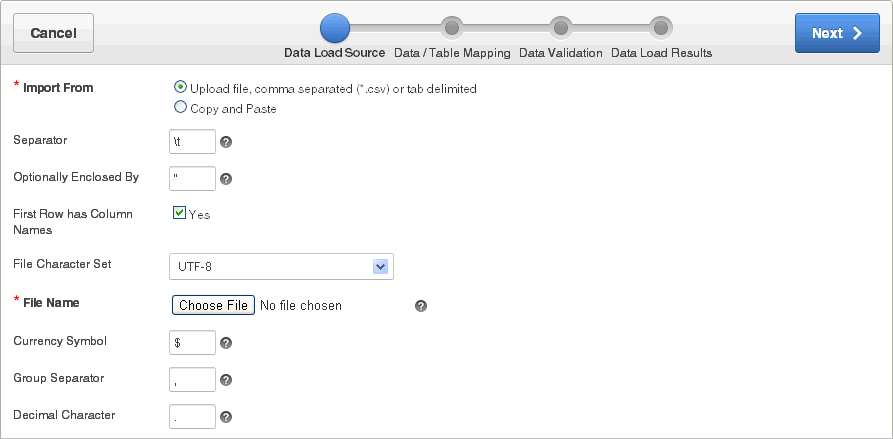
Import From - Select Upload file, comma separated (*.csv) or tab delimited.
The Data Load Source page appears with options for loading from a data file.

Description of the illustration data_load_source.gif
-
Separator - Enter the column separator character. Use
\tfor tab separators. -
Optionally Enclosed By - Enter a delimiter character to delineate the start and end boundary of a data value.
-
First Row has Column Names - Options include:
-
Yes - Columns are named with column names from the first row of the uploaded data file.
-
No - Columns will not be named with column names from the uploaded data file.
-
-
File Character Set - Select the file character set associated with the file to be uploaded.
-
File Name - Browse to the file name containing the data to upload.
The following example shows an example
customer.txtdata load file.
Description of the illustration customer.gif
-
Currency Symbol - If your data contains an international currency symbol, enter it here. For example, if your data has "$1,234.56" or "¥1,234.56", enter $ or ¥. Otherwise the data may not load correctly.
-
Group Separator - If your data contains a group separator, enter it here. A group separator is a character that separates integer groups, for example, to show thousands and millions.
Any character can be the group separator. The character specified must be single-byte, and the group separator must be different from any other decimal character. The character can be a space, but cannot be a numeric character or any of the following: plus sign (
+), hyphen (-), less than sign (<), or greater than sign (>). -
Decimal Character - If your data contains a decimal character, enter it here. The decimal character separates the integer and decimal parts of a number. Any character can be the decimal character. The character specified must be single-byte, and the decimal character must be different from any other group separator. The character can be a space, but cannot be a numeric character or any of the following: plus sign (
+), hyphen (-), less than sign (<), or greater than sign (>)
-
-
Click Next.
The Data/Table Mapping page appears.

Description of the illustration data_table_mapping.gif
-
For Data/Table Mapping:
-
Column Mapping - Indicates the destination column name. To change the column name, select a new column name from the list. To hide a column, select Do Not Load.
-
Date/Number Format - Most of the standardized date and number formats are automatically parsed and then passed to the database. If you want to define your own format or the format is not an automatically parsed format, use this field to define your own. See "Automatically Supported Date, Timestamp and Number Formats".
-
Click Next.
The Data Validation page appears showing the data to be inserted or updated after any table lookup and transformation rules have been applied. For more information regarding table look up and transformation rules, see "About Using the Data Loading Wizard".

Description of the illustration validation.gif
-
-
Review the data to be uploaded and click Load Data.
The Data Load Results page appears.

Description of the illustration data_load_results.gif
The Data Load Results page displays:
-
Inserted Row(s) - This is the number of new rows uploaded to the table.
-
Updated Row(s) - This is the number of rows in the table updated with new information.
-
Failed Row(s) - This is the number of rows from the upload file that were not added or updated.
-
To be Reviewed Row(s) - This is the number of rows needing review.
-
-
Click View Customers to return to the Customers page.
4.3 Copying and Pasting Data into Your Application
To upload data to your application, the application must have been built with Data Upload capability and the pasted data must be formatted properly.
To illustrate how you can use the Data Load wizard to copy and paste data from a text file, the following section demonstrates the upload process and includes an illustration of the sample packaged application, Sample Database Application.
To copy and paste data into your application:
-
Log into the sample packaged application, Sample Database Application.
-
On the Customers page, click Upload Data to launch the Data Load wizard.
The first page of the Data Load wizard appears.

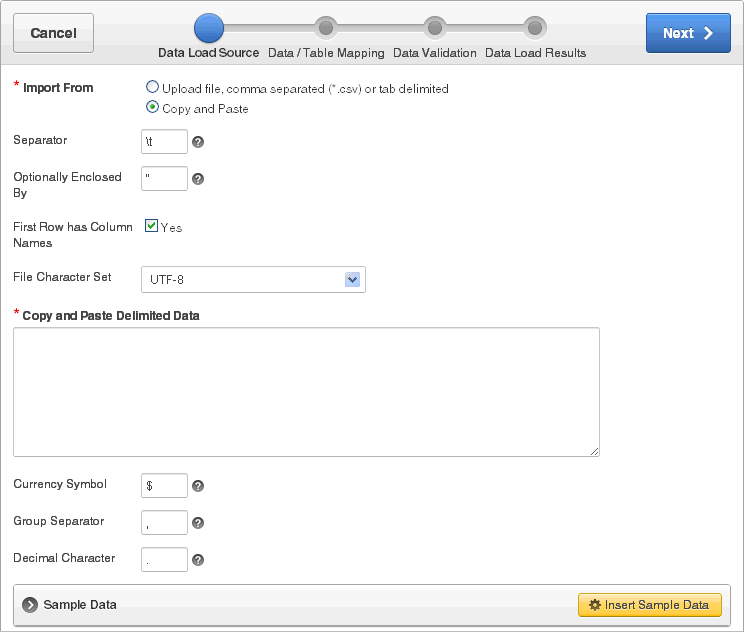
Description of the illustration data_load_paste.gif
-
For Data Source Load:
-
Import From - Select Copy and Paste.
-
Separator - Enter the column separator character. Use
\tfor tab separators. -
Optionally Enclosed By - Enter a delimiter character to delineate the start and end boundary of a data value.
-
First Row has Column Names - Options include:
-
Yes - Columns are named with column names from the first row of the uploaded data file.
-
No - Columns will not be named with column names from the uploaded data file.
-
-
File Character Set - Select the file character set associated with the data to be copied.
-
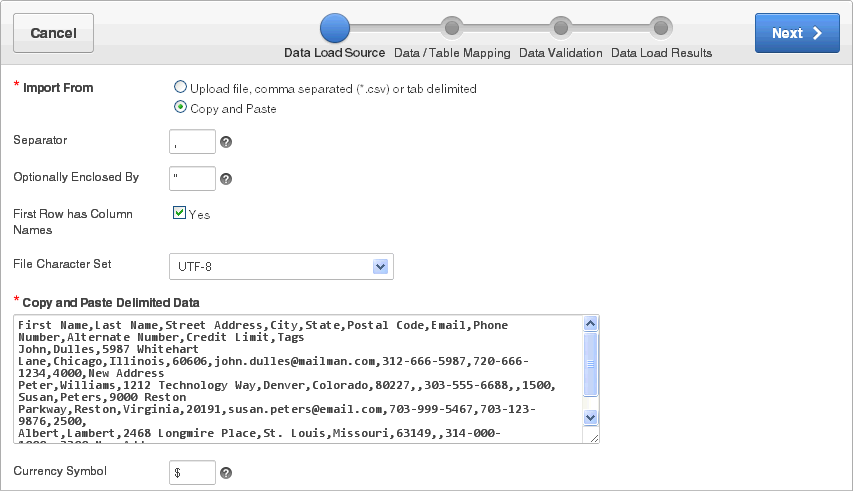
Copy and Paste Delimited Data - Click the Insert Sample Data button at the bottom of the page.
The sample data appears in the Copy and Paste Delimited Data field.

Description of the illustration copy_example.gif
-
Currency Symbol - If your data contains an international currency symbol, enter it here. For example, if your data has "$1,234.56" or "¥1,234.56", enter $ or ¥. Otherwise the data will not load correctly.
-
Group Separator - If your data contains a group separator enter it here. A group separator is a character that separates integer groups, for example to show thousands and millions.
Any character can be the group separator. The character specified must be single-byte, and the group separator must be different from any other decimal character. The character can be a space, but cannot be a numeric character or any of the following: plus sign (
+), hyphen (-), less than sign (<), or greater than sign (>). -
Decimal Character - If your data contains a decimal character, enter it here. The decimal character separates the integer and decimal parts of a number. Any character can be the decimal character. The character specified must be single-byte, and the decimal character must be different from any other group separator. The character can be a space, but cannot be a numeric character or any of the following: plus sign (
+), hyphen (-), less than sign (<), or greater than sign (>)
-
-
Click Next.
The Data/Table Mapping page appears.

Description of the illustration data_table_mapping.gif
-
For Data/Table Mapping:
-
Column Mapping - Indicates the destination column name. To change the column name, select a new column name from the list. To hide a column, select Do Not Load.
-
Date/Number Format - Most of the standardized date and number formats are automatically parsed and then passed to the database. If you want to define your own format or the format is not an automatically parsed format, use this field to define your own. See "Automatically Supported Date, Timestamp and Number Formats".
-
Click Next.
-
-
Click Next.
The Data Validation page appears showing the data that to be inserted or updated after any table lookup and transformation rules have been applied. For more information regarding table look up and transformation rules, see "About Using the Data Loading Wizard".

Description of the illustration validation2.gif
-
For Data Validation, review the data to be uploaded and click Load Data.
The Data Load Results page appears.

Description of the illustration data_load_results2.gif
The Data Load Results page shows:
-
Inserted Row(s) - This is the number of new rows uploaded to the table.
-
Updated Row(s) - This is the number of rows in the table updated with new information.
-
Failed Row(s) - This is the number of rows from the upload file that were not added or updated.
-
To be Reviewed Row(s) - This is the number of rows needing review.
-
-
Click View Customers to return to the Customers page.
4.4 Automatically Supported Date, Timestamp and Number Formats
During the data upload process the following date, timestamp and number formats are automatically parsed and passed to the database.
Automatically Supported Date Format Masks
'MM/DD/RRRR'
'DD/MM/RRRR'
'DD/MM/RR'
'fmMM/DD/RRRR'
'fmDD/fmMM/RRRR'
'RRRR.MM.DD.'
'DD-MM-RR'
'DD.MM.RRRR'
'DD/MON/RR'
'RRRR-MM-DD'
'DD-MM-RRRR'
'fmDD/MM/RRRR'
'RRRR/MM/DD'
'DD.MM.RR'
'fmRRRR/MM/DD'
'fmDD.MM.RRRR'
'MM/DD/RRRR'
'RRRR.MM.DD'
'fmDD-MM-RRRR'
'RRRR-MM-DD"T"hh24:mi:ss'
Automatically Supported Timestamp Format Masks
'DD/MM/RR HH24.MI.SSXFF'
'DD.MM.RR HH:MI:SSXFF PM'
'DD/MM/RR HH:MI:SSXFF PM'
'DD-MON-YYYY HH24:MI'
'DD-MON-YYYY HH24.MI.SSXFF'
'DD-MON-YYYY HH:MI:SSXFF PM'
'DD-MON-YYYY HH24:MI TZR'
'DD-MON-YYYY HH24.MI.SSXFF TZR'
'DD-MON-YYYY HH.MI.SSXFF PM TZR'
Automatically Supported Number Format Masks
'FML999G999G999G999G990D00'
'999G999G999G999G990D00'
'999G999G999G999G990D0000'
'999G999G999G999G999G999G990'
'999G999G999G999G990D00MI'
'S999G999G999G999G990D00'
'999G999G999G999G990D00PR'