4.2 Tracking Features
Use the Features page to track features from initial concept through implementation. You can organize features by release, assignee, tags, or associated milestones.
4.2.1 Viewing Features
To view features:
-
On the Workspace home page, click the Team Development icon.
-
Click the Features icon.
The Features Dashboard appears.
The Features Dashboard displays an overview of features defined within the workspace for the selected assignee, release, or application. Click the hyperlinks to drill into the selected feature, owner, contributor, and so on. See "About the Features Dashboard".
-
Click the Features tab. See "About the Features Page".
4.2.1.1 About the Features Page
The Features page displays an interactive report that displays details about each feature. You can further customize the appearance of the page using the Search bar at the top of the page. Available controls on the Search bar include:
-
Select columns to search - This icon resembles a magnifying glass. Click this icon to narrow your search to only specific columns. To search all columns, select All Columns.
-
Text area - Enter case insensitive search criteria (wildcard characters are implied) and then click Go.
-
Go button - Executes a search or applies a filter.
-
View Report - Displays each feature as a line in a report. Use the Actions menu to customize this report.
-
View Detail - Displays detailed information about each feature. To display less information, click Basic.
-
Actions menu - Use this menu to customize the report view. See "About the Actions Menu".
4.2.2 Creating a Feature
To create a feature:
-
On the Workspace home page, click the Team Development icon.
-
Click the Features icon.
The Features Dashboard appears.
-
Click Create Feature.
-
Fill in the appropriate fields. Mandatory fields are marked with a red asterisk (*).
-
To learn more about a specific field, see item Help. See "About Field-Level Help".
-
To add new values to editable select lists, enter a value in the field with the title New. For example, to add name to the Feature Owner list, enter a value in New Feature owner.
The value you enter is added.
-
Click Create Feature.
See Also:
"Editing Focus Areas"4.2.2.1 Creating Parent Features
You can group features hierarchically using the Parent Feature attribute. Selecting a Parent Feature creates a parent/child relationship. When viewing features in Tree view, features are grouped first by release and then by parent. To learn more, see "About Tree".
4.2.3 Updating a Feature
To update a feature:
-
On the Workspace home page, click the Team Development icon.
-
Click the Features icon.
The Features Dashboard appears.
-
Click the Features tab.
The Features page appears.
-
How you edit a feature description depends upon the View selected in the Search bar. Options include:
-
View Detail - Click the feature number.
-
View Report - Click the Edit icon.
-
-
Edit the appropriate fields.
-
To add new values to editable select lists, enter a value in the field with the title New (for example, New Owner).
For example, to add a name to the Feature Owner list, enter a value in New Owner.
The value you enter is added.
-
Click Apply Changes.
See Also:
"Editing Focus Areas"4.2.4 About Attaching Files to a Feature
If enabled at the workspace-level, you can attach files to features. To learn more, see "Enabling Support for File Attachments in Team Development" in Oracle Application Express Administration Guide.
4.2.4.1 Attaching a File to a Feature
To attach a file to a feature:
-
Navigate to the Feature page. See "Updating a Feature".
-
From Actions, click Add File.
-
On Add File:
-
File - Locate the file to be uploaded.
-
Description - Enter a description of the file.
-
Click Add File.
A new region, called Files, displays at the bottom of the Feature page.
-
4.2.4.2 Viewing, Editing, and Removing Attached Files
To view, edit, or remove attached files:
-
Navigate to the Feature page. See "Updating a Feature".
-
Scroll down to Files.
-
Click View and Manage Files.
The Files page appears.
-
To view a file, click the name.
-
To edit the file description, click the Edit icon.
-
To delete an attached file, click the Delete icon.
4.2.5 Viewing Feature Reports
Use feature reports to view features from different perspectives.
See Also:
"About Feature Utilities"4.2.5.1 About the Features Dashboard
The Features Dashboard displays an overview of features defined within the workspace for the selected assignee, release, or application. Click the hyperlinks to drill into the selected feature, owner, contributor, and so on. The Dashboard page contains the following regions:
-
Percent Complete
-
Development Progress
-
Owners
-
New Features
To edit the dashboard:
-
Edit the following fields at the top of the page and click Set.
-
Assignee
-
Release
-
Application
-
-
To reset the dashboard to the default display, click the Reset button.
4.2.5.2 About Tree
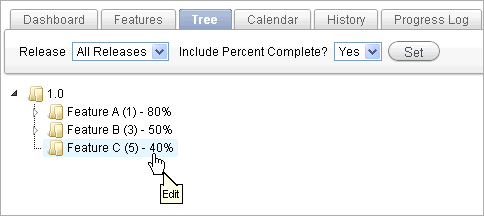
The Tree page displays features in a hierarchical tree by release. To select a new release, make a selection from the Release list. The feature number and percent complete display to the right of the feature name. To hide or display the percent complete, select Yes or No from Include Percent Complete and click Set. To edit a feature, simply click it.

Description of the illustration td_tree.gif
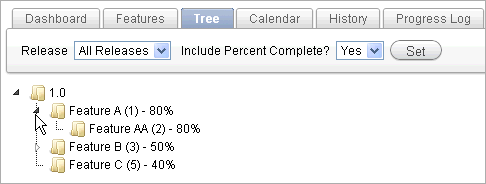
Features are grouped first by release and then by parent. To expand a grouping, click the small triangle to the left of the feature name.

Description of the illustration td_tree_expand.gif
Tip:
When displaying features by a given release, features with parent or children features in different releases do not display.Click the Expand All and Collapse All buttons to expand or collapse all grouping. To view or edit a feature, click the feature name. The Feature page appears. To create a feature, click Create Feature and follow the online instructions.
See Also:
"Creating a Feature"4.2.5.3 About Calendar
The Calendar page displays features by due date or date completed in a calendar format. Click the Previous and Next buttons to view other months. To view feature milestones for the current day, click Today. To view a specific feature, click the feature name. To create a feature, click Create Feature and following the online instructions.
See Also:
"Creating a Feature"If a parent features have been defined, the due date or date completed displays in a calendar format. Click the Previous and Next buttons to view other months. To view feature milestones for the current day, click Today. To view a specific feature, click the feature name. To create a feature, click Create Feature and following the online instructions.
4.2.5.4 About History
Displays a report of recently changed features, including the old value and new value and who made the update. To view a specific feature, click the feature name.
The Change History page displays as an interactive report. To customize the report, use the Search bar at the top of the page. To learn more, see "Customizing Interactive Reports".
4.2.5.5 About Progress Log
Displays a report of progress log entries. The progress log shows all the progress entries across all features. To view log entries by release, make a selection from the Release select list and click Set. To edit the log, click the Edit icon.
The Progress Log page displays as an interactive report. To customize the report, use the Search bar at the top of the page. To learn more, see "Customizing Interactive Reports".
4.2.5.6 About Focus Areas
Displays a chart of the number of features per defined focus area by release. To alter the chart, select another release or another assignee and click Set. To return to the default chart, click Reset.
4.2.5.7 About Owners
Displays a chart of the number of features by owner. To alter the chart, select another release, minimum status, or maximum status and click Set. To return to the default chart, click Reset.
4.2.5.8 About Utilities
Use the Feature Utilities page to manage milestones for multiple features. Select one of the following and follow the on-screen instructions:
-
Assign milestones to features (only those with no milestone currently assigned).
-
Set feature due date to milestone date (only affects features).
-
Change milestone for overdue features.
-
Push due date of open features.