| Oracle® Auto Service Request Release 3.2 for Oracle Enterprise Linux and Solaris |
|
|
Mobi · ePub |
| Oracle® Auto Service Request Release 3.2 for Oracle Enterprise Linux and Solaris |
|
|
Mobi · ePub |
My Oracle Support provides an interface to the ASR service: both for activation of ASR Assets and for viewing any Service Requests generated from ASR.
With your valid, Oracle Premier Support or Warranty contract, you will need to access My Oracle Support to complete the ASR activation process. You can also view all hardware assets associated with your support identifier.
This chapter includes instructions for using My Oracle Support to perform the following tasks:
Requesting support identifier access
Viewing Assets
Enabling ASR Assets
To install the ASR software components, you must provide a valid Sun Online Account (SOA) login name in order to validate key information about the systems targeted for ASR installation (for example, serial numbers). Instructions for creating an SOA login are provided in section "Create a Sun Online Account".
With Oracle Premier Support, a support contract is composed of one or more support identifiers. Each support identifier can cover one or more hardware assets. You must have the appropriate account access before you can complete any ASR installation. Only the Customer User Administrator (CUA) can approve an ASR Asset.
To request access to your support identifier:
Login to My Oracle Support (https://support.oracle.com). Note that your Oracle Single-Sign On user name is your email address. You can register if you are a new user.
In the My Oracle Support Dashboard, click the “More...” tab. Then select “Settings” from the menu.
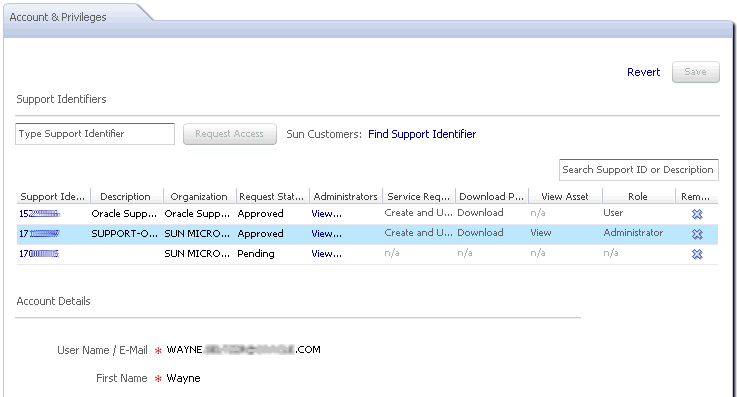
In the "Settings" pane on the left, select "Account & Privileges" (located under the Personal submenu). Information about your account and access privileges will display:

If you already have the support identifier number, enter it in the field and click the “Request Access” button. If you do not know your support identifier, click “Find Support Identifier” to perform a search. You can search on:
The hardware system serial number
Organization
Existing Sun Contract number
Access requests are sent to the account administrator to approve. Once approved, you will be able to view information about the assets associated with your support identifier.
Once you have access to your appropriate support identifier, you can review all hardware assets associated with it. To view all assets associated with your support identifier:
Login to My Oracle Support (https://support.oracle.com).
In the My Oracle Support Dashboard, click the “More...” tab. Then select “Settings” from the menu.
In the “Settings” pane on the left of the window, select “Assets” (located under the Administrative submenu). All assets associated with your support identifier will display.
The last column of the table shows the asset's “ASR Status.” There can be four values for this field:
Active: ASR is active for this asset.
Inactive: the asset has the correct ASR software installed, but it is not active. Assets can be set to “inactive” for any number of reasons (e.g., asset maintenance, patch updates, contract expiration).
Pending: the asset has the correct ASR software installed, but has not yet been enabled. See the next section ("Enable ASR Assets in My Oracle Support").
[Empty]: The asset has not sent an ASR activation request to Oracle.
You can view information about a particular asset, and in some cases, you can update information about the asset. To view the information, click the asset's serial number. You can update the following content:
Asset Name: you can give the asset an alias to help system administrators readily identify a particular system. This option can be useful if there are many qualified assets associated with the support identifier or if you want to specifically call out an ASR Master system.
Contact Name: the name of the person responsible for the particular machine. This name should be either a system administrator, primary developer, etc. All assets configured for ASR must have a contact name. An asset cannot be enabled without this information. The Contact's Customer Support Identifier must be approved in My Oracle Support in order for the Contact to view assets.
Address: the address fields should indicate the location of the asset.
Note:
For more information on how to use My Oracle Support, click the Help link in the upper-right-hand corner.My Oracle Support includes a Message Center to show when a user action is required. If you have the correct association to a support identifier, then you will receive a message when the following ASR actions are required:
Show Assets with ASR 'No Heartbeat' Issue
This message indicates a network or connection problem with the ASR Asset.
Approve ASR Assets
As new qualified hardware is associated with a support identifier, they need to be approved to be ASR Assets. This message shows when an ASR Asset is awaiting approval. The ASR service will not be enabled for the asset until it is approved in My Oracle Support.
To complete the installation of ASR, you will need to login to My Oracle Support. To complete the installation of ASR:
Install the ASR software:
See "Install the ASR Manager" on page 3-1 for instructions to install the ASR Manager software.
See"Configure and Manage ASR Assets" on page 4-1 for instructions to install ASR software on qualified assets.
Activate the ASR Asset from the ASR Manager. This step will allow the asset to be approved or denied for ASR activation with My Oracle Support:
Register and verify the ASR Manager (see "Register the ASR Manager")
Activate for ASR Assets (see "Activate ASR Assets")
Login to My Oracle Support (https://support.oracle.com).
In the My Oracle Support Dashboard, click the “More...” tab. Then select “Settings” from the menu.
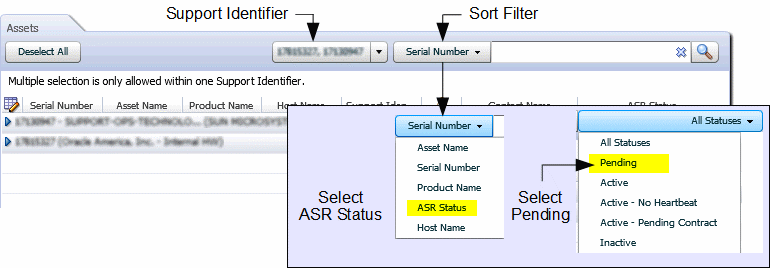
In the “Settings” pane on the left of the window, select “Assets” (located under the Administrative submenu). For your Support Identifier, select "ASR Status" from the sort filter, then select Pending from the "All Statuses" drop-down menu:

Note:
By default, all support identifiers that you are associated with are displayed. If this list of assets is long, you can limit the display to show only assets associated to one support identifier.You can filter and sort on asset columns to find the assets you are interested in.
You can approve a Pending asset two ways:
Activate via Asset Toolbar
Click the asset's serial number to display a toolbar with following options:
Assign Contact - select this option to assign a contact to the asset. Only users associated with the support identifier can be a contact.
Change Address - select this option to update the asset's physical location.
Approve - for assets that are Pending, click Approve to enable ASR for the asset.
Other Actions - you can also perform other actions such as Activate (for an inactive asset), Deactivate (for an active asset), or Deny (for a pending request).
The Asset Toolbar looks like this:

Note:
You can use the Asset Toolbar to update multiple assets. To select multiple assets:Click the checkbox of each asset.
Click the first asset then shift-click another asset to select all the assets in a range.
Activate via Asset Details
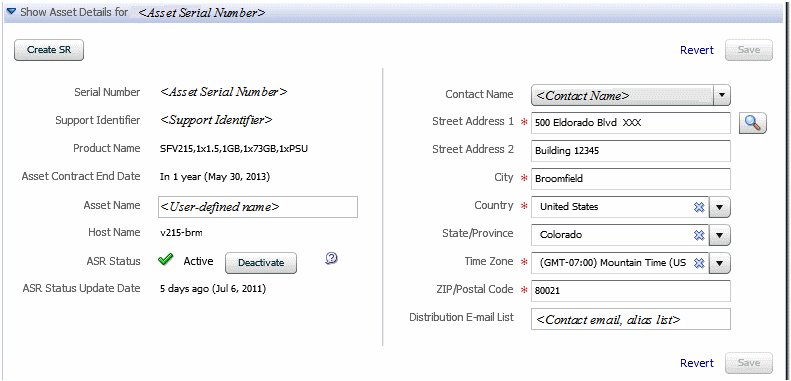
At the bottom of the Asset pane, there is a "Show Asset Details" option. Click an asset's serial number and then the "Show Asset Details" to update information about the asset. The ASR Activation window will appear and look like this:

Required fields for ASR asset activation are indicated by an asterisk (*). You should update and verify the following fields:
Asset Name: You can assign a name for the asset.
ASR Status: This field shows the current status of the ASR Asset. For Pending assets, click the Approve button to enable the asset for ASR.
Note:
There can be many reasons to deny ASR activation. For example, if the machine is part of a test environment and you do not want to receive status email from ASR, then you can click the Deny button to exclude it from ASR. You can always update the settings for the machine to include it.Contact Name: Users that have been associated with the Support Identifier for the asset will appear in this drop-down menu. Click the drop-down menu to see the list of available names.
Street Address 1: Enter the street address for the physical location of the asset.
Country: Select the asset's country location from the drop-down menu.
ZIP/Postal Code: enter the ZIP/postal code for the asset's location.
Distribution Email List: You may add an email address that will receive all ASR email notifications (for example "asr_notify@mycompany.com"). Oracle ASR will send email to the Contact's email address and the Distribution Email List, if provided. You may also include multiple email addresses, separated by commas (for example, "asr_notifyteam1@mycompany.com, asr_notify_team2@mycompany.com"). This feature is useful if your organization has one or more teams that should be informed about Service Requests created by ASR.
As part of the installation process, the ASR installer will include certain information you provide with your SOA login. To create a Sun Online Account:
Go to https://reg.sun.com and follow the "Registration" links.
Once registered, make sure you are logged into the Sun Online website (https://reg.sun.com).
Confirm that the information listed below is valid. This information is used by ASR. Click on the drop-down menu at the Welcome [customer_name] link and select Manage My Account to change any information, if needed.
Note:
If you already have a Sun Online Account (SOA) login, verify your information is correct.Company name
Street address
City
Province/Postal code
Country
Contact telephone number
Keep track of your login credentials for future use.
If support services for your ASR assets are provided by an Oracle Partner, the Partner is responsible for ASR activation in My Oracle Support. When ASR detects a fault, only the Partner is notified of the problem.
ASR generates a draft Service Request in My Oracle Support, accessible only to the Partner. If the Partner requires assistance from Oracle Support to resolve the problem, they use My Oracle Support to promote the draft Service Request to a technical Service Request.
The Partner's My Oracle Support account must have access to their respective partner Customer Support Identifier (CSI) and the customer's CSI associated with the asset and must have administrator privileges on both CSIs. The Partner has the responsibility to:
Use My Oracle Support to:
Assign contacts to ASR assets. The contact must be a member of the Partner's organization, and the MOS account must be associated with the Partner's CSI.
[optional] Assign distribution email addresses to ASR assets. This can be used to send ASR email notifications to an email list maintained by the Partner.
Activate ASR assets.
Maintain ASR asset information.
Provide a Sun Online Account username and password to register the ASR Manager, using a Partner email address.
Provide service to their customers when ASR detects problems.
You can use My Oracle Support to view ASR asset status, but you cannot edit the ASR asset information.