3.4 About Sample Websheet - AnyCo IT Department
This section describes the packaged application, Sample Websheet - AnyCo IT Department. Sample Websheet - AnyCo IT Department highlights the features and capabilities of Websheets.
3.4.1 Installing and Running AnyCo IT Department
To install and run Sample Websheet - AnyCo IT Department:
-
Go to the Packaged Applications page. See "Accessing the Packaged Applications Page".
The Packaged Applications page appears.
-
From the Category list, select Sample.
-
From the Type list, select Websheets.
-
Locate Sample Websheet - AnyCo IT Department.
-
Click the application image.
A summary page appears.
-
Click Install Application.
-
Select an Authentication scheme and click Next.
-
Click Install Application again.
A success message appears.
-
To run the application, click the Run Application icon.
-
Enter the appropriate login credentials:
-
Username - Enter your workspace username.
-
Password - Enter your workspace password.
-
Click Login.
-
The home page appears.
3.4.2 About Websheet Navigation
Every Websheet contains common navigation elements that enable you to quickly move within a page or between pages. Each Websheet page is divided into sections. You can hide and unhide a page section by clicking the arrow to the left of the Section title. In the following example, Systems Overview is hidden.
Description of the illustration websheet_nav1.gif
3.4.2.1 Using Breadcrumbs to Navigate Between Websheet Pages
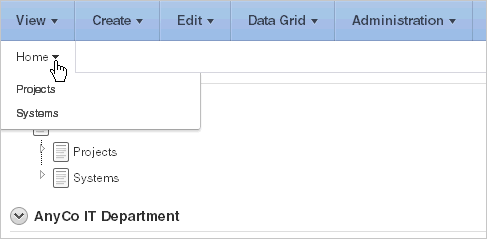
A breadcrumb displays at the top of every Websheet page. Positioning the mouse over the Home breadcrumb displays a submenu of links to all the pages in the Websheet.
Description of the illustration websheet_bread.gif
See Also:
"Viewing the Page Directory"3.4.3 Understanding AnyCo IT Department
Sample Websheet - AnyCo IT Department demonstrates the following functionality:
-
Examples of ways to share text, data, and images using a Websheet pages
-
Hierarchical navigation between page sections and pages
-
Formatted text that includes easily formatted links
-
Display of tabular data by creating Data Grids and displaying the content as reports, interactive report, or charts.
The following sections describe specific functionality available on each page.
3.4.3.1 Understanding Navigation
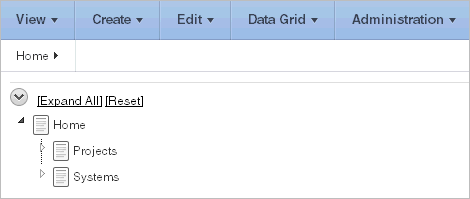
The hierarchical tree displays at the top of the home page enables you to navigate between Websheet pages. Click the arrow to the left of the Home breadcrumb to expand or collapse the tree. To learn more about adding navigation, see "About Navigation Sections".
Description of the illustration websheet_nav.gif
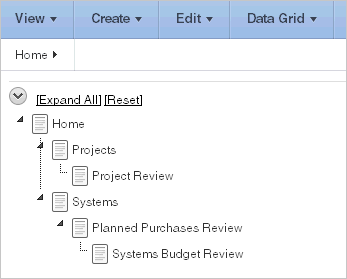
To view subsections (or children) within a section, click the arrow to the left of a section name. Click Expand All to view all pages and page subsections and Reset to return the tree to the default display. To link to another page, select the page name.
Description of the illustration websheet_nav2.gif
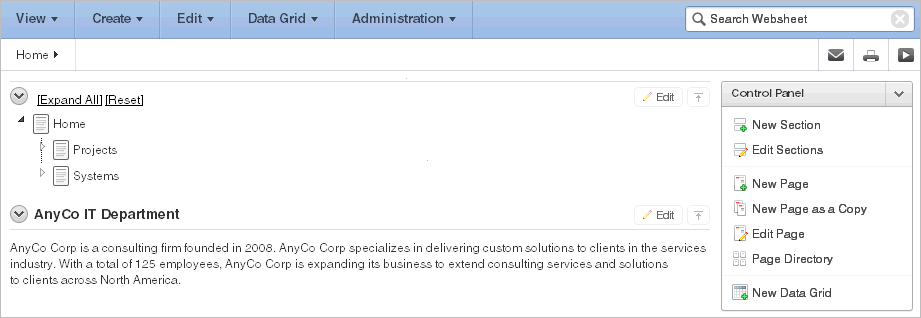
3.4.3.2 About the Home Page
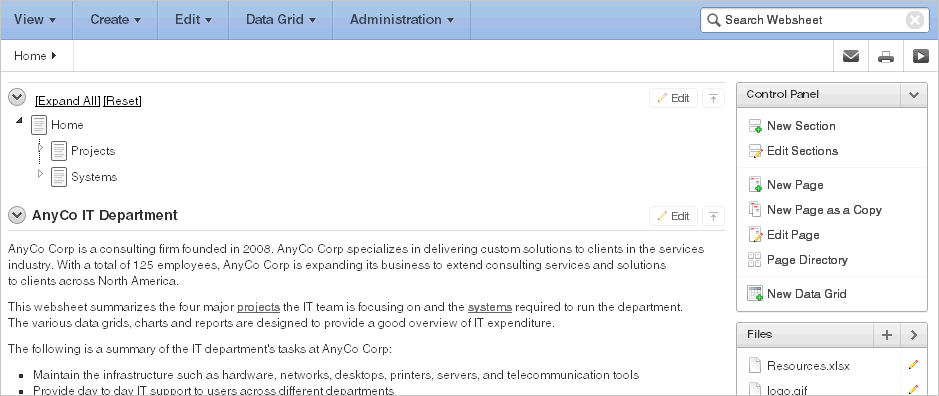
Description of the illustration websheet_home.gif
The Sample Websheet - AnyCo IT Department home page contains four sections:
-
Page navigation tree
-
AnyCo IT Department
-
Projects Summary
-
Systems Summary
AnyCo IT Department is a text section that includes links to other pages and an embedded image.
Projects Summary is a data grid that displays as 3D chart. Passing the cursor over a bar changes the color and displays a dollar amount.
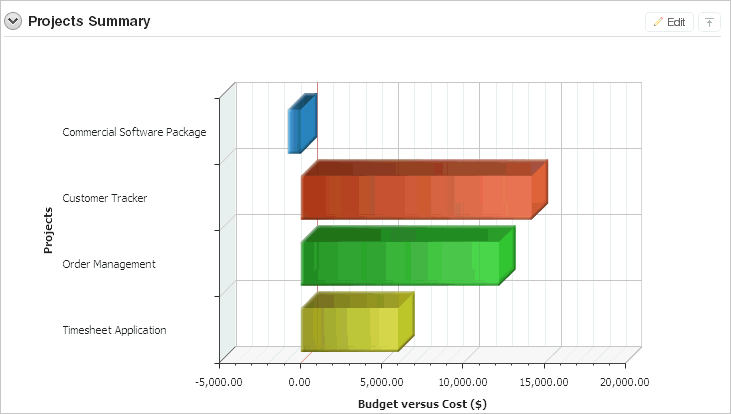
Description of the illustration websheet_proj_sum.gif
Systems Summary is a report of hardware, software, and cloud services. The bottom of the section includes links to Systems Management report and to the Systems page.
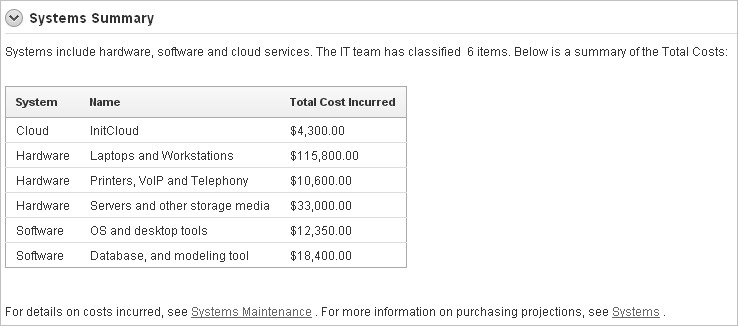
Description of the illustration websheet_sys_sum.gif
See Also:
"Using SQL and SQLVALUE Syntax"3.4.3.3 About the Projects Page
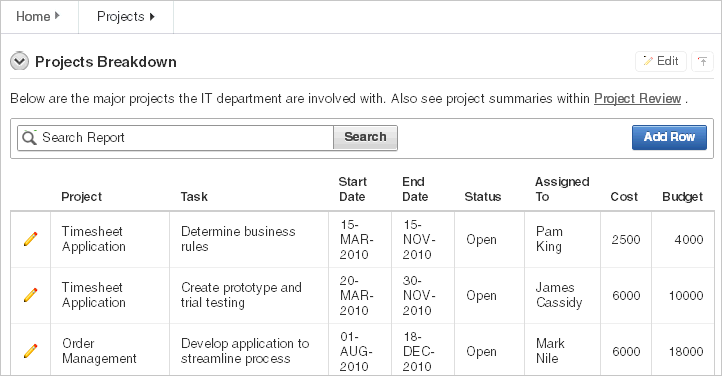
Description of the illustration websheet_table.gif
The Project contains one section, Projects Breakdown. The Projects Breakdown section includes a link to the Project Review page and an updatable report of major IT projects.To edit a specific project, click the Edit Row icon. To add another projects, click the Add Row icon.
See Also:
"Using SQL and SQLVALUE Syntax"3.4.3.4 About the Project Review Page
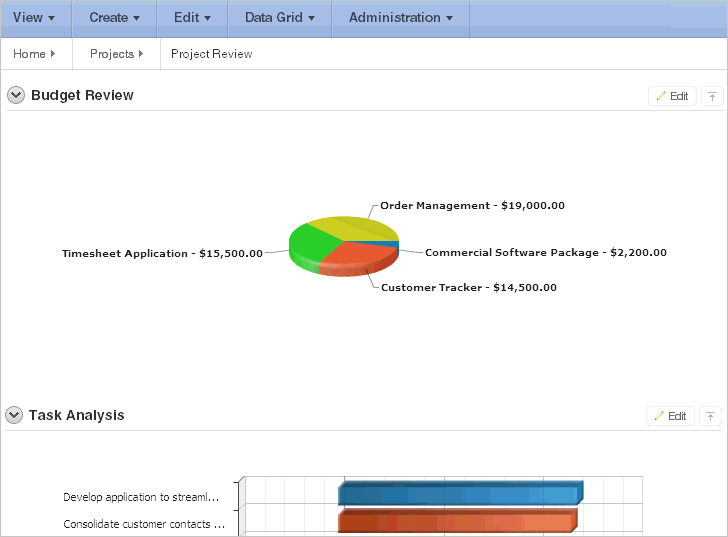
Description of the illustration websheet_proj_review.gif
The Project Review page contains two sections, Budget Review and Task Analysis. Both sections are data grids that display as different types of 3-D charts.
See Also:
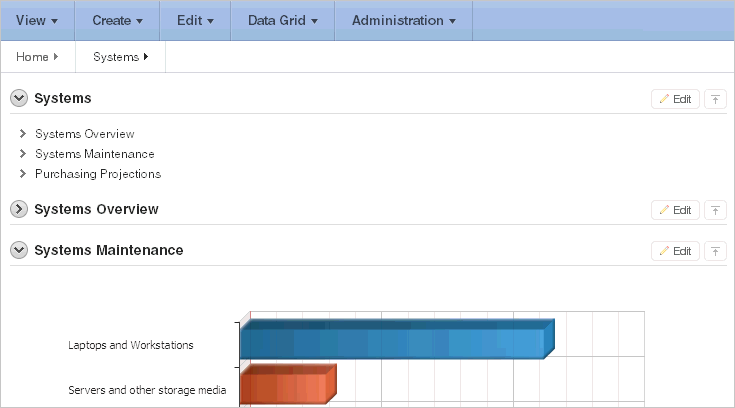
"About Chart Sections"3.4.3.5 About the Systems Page
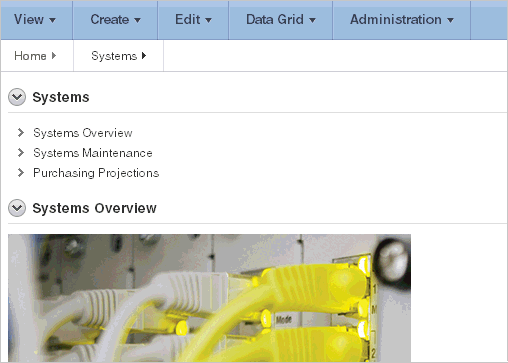
Description of the illustration websheet_sys_nav.gif
The Systems page contains three sections:
-
System (navigation)
-
System Overview
-
Systems Maintenance
-
Purchasing Projections
System is a navigation section that includes links to the sections, Systems Overview, Systems Maintenance, and Purchasing Projections.
System Overview is a text section that includes an embedded image and links to other pages.
System Maintenance is a data grid that displays as a 3D horizontal chart. Passing the cursor over a bar changes the color and displays a dollar amount.
Purchasing Projections features a report of planned purchases and a link to the Planned Purchases Review page. To add entries, click Add Row.
3.4.3.6 About Planned Purchase Review
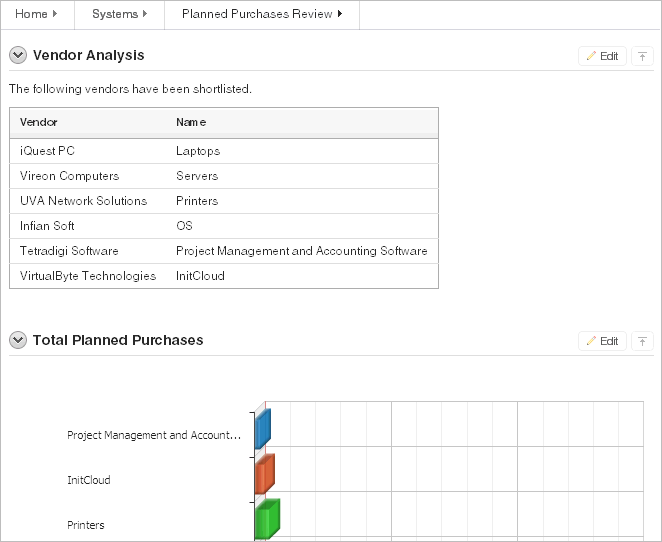
Description of the illustration websheet_plan_pur.gif
The Planned Purchase Review page contains two sections:
-
Vendor Analysis
-
Total Planned Purchases
Vendor Analysis is report of vendors.
Total Planned Purchases is a data grid that displays as 3D horizontal chart. Passing the cursor over a bar changes the color and displays a dollar amount.
3.4.3.7 About Systems Budget Review
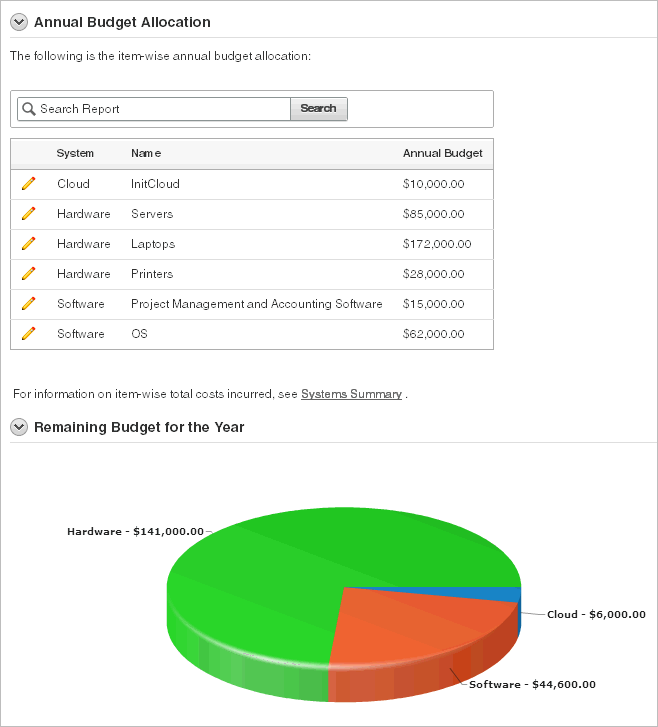
Description of the illustration websheet_bud_alloc.gif
The Systems Budget Review page contains two sections:
-
Annual Budget Allocation
-
Remaining Budget for the Year
Annual Budget Allocation is a report budget categories. To update report item, click the Edit Row icon.
Remaining Budget for the Year is a data grid that displays as 3D pie chart. Passing the cursor over a pie section displays the dollar amount. Selecting a section, removes it slightly from the pie.
3.4.4 Common Websheet User Interface Elements
The sections that follow describe interface elements common of all Websheets.
3.4.4.1 About Websheet Menus
Description of the illustration websheet_nav.gif
Five menus display at the top of each Websheet:
-
View
-
Create
-
Edit
-
Data Grid
-
Administration
Many of the create and edit options within these menus are duplicated on the Control Panel that displays on the right side of the page. To learn more, see "About Websheet Applications".
3.4.4.2 About Websheet Search
The Search Websheet field displays in the upper right of each Websheet page.

Description of the illustration websheet_search.gif
Use Search Websheet to perform case insensitive searches of application content. To learn more, see "About Websheet Search".
3.4.4.3 About the Control Panel
The Control Panel displays on the right side of each Websheet page and includes commands available in the Create, Edit, and View menus at the top of the page. To hide or display the Control Panel, click the arrow to the right of the region title.
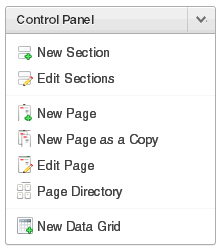
Description of the illustration websheet_control_panel.gif
The Websheet Control Panel contains the following options:
-
New Sections. See "About Adding and Editing Page Sections".
-
Edit Sections. See "About Adding and Editing Page Sections".
-
New Page. See "Adding a New Page".
-
New Page as a Copy. See "Copying an Existing Page".
-
Edit Page. See "Editing Page Details".
-
Page Directory. See "Viewing the Page Directory".
-
New Data Grid. See "Creating a Data Grid".
3.4.4.4 About the Files Region
The Files region displays below the Control Panel. The Files region displays files currently upload to the current page. To hide or display the Control Panel, click the arrow to the right of the region title.
See Also:
"Managing Uploaded Files and Images"3.4.4.5 About the Tags Region
Use the Tags region to enter tags that identify the current page and facilitate searching. To hide or display the Tags region, click the arrow to the right of the region title.
See Also:
"Adding Tags"3.4.4.6 About the Notes Region
The Notes region displays notes associated with current page. To hide or display the Notes region, click the arrow to the right of the region title.
See Also:
"Adding Notes"3.4.5 Modifying Websheet Content
Once you understand the type of functionality available in AnyCo IT Department, the next step is to learn more about the construction of each page. Analyzing the deconstruction of an application is an efficient way to speed up the learning process. If you break something, you can quickly delete the demonstration application and install it again. See "Managing Packaged Applications".
Tip:
Oracle Application Express includes two types of packaged applications: sample and productivity applications. By default, sample applications are fully editable. In contrast, you must unlock a productivity application before you can edit it. Unlocking a productivity packaged application makes it ineligible for future upgrades or support by Oracle Support.The section that follows offers a high-level discussion of editing a Websheet. To learn more, see "About Websheet Applications".
To update a Websheet section:
-
Run the Websheet as described in "About Packaged Applications".
-
Click the Edit icon that displays in the upper right of the section.
Description of the illustration websheet_edit_sect.gif
The Edit Section page appears. How you edit a specific section depends upon the section type.
-
Edit the fields provided.
-
To change the formatting, click the Expand Toolbar icon in the upper right corner.
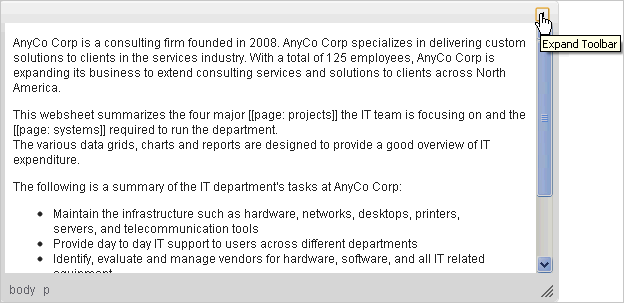
Description of the illustration websheet_toolbar2.gif
The Toolbar appears. When you pass your cursor over an icon, a descriptive tooltip displays.
-
To hide the toolbar, click the Collapse Toolbar icon.
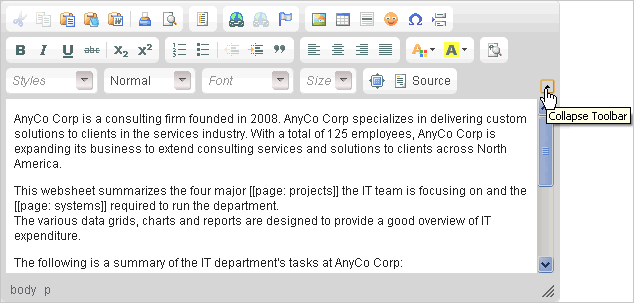
Description of the illustration websheet_toolbar.gif
-
To save your changes, click Apply Changes.
See Also:
"About Adding and Editing Page Sections" to learn more about editing Websheets